Calculating the Average Product Page Views Before Actual Conversion

Product Detail Page (PDP) is a page where product description and a call-to-action (CTA) button — like add-to-cart for eCommerce, submit a Contact Us form, or similar actions for lead-gen sites — are located. These pages are also known as money pages because they most often refer conversions. It’s no wonder that we need to pay attention to these pages and analyze their performance.
Enhanced eCommerce reports in Google Analytics provide you with Product Impressions or Product Detail Page Views data, which is the total views of Product Detail pages per product. If you have Enhanced eCommerce implemented on your website, you could create {{Product Detail Views}} / {{Users}} and {{Product Detail Views}} / {{Transactions}} calculated metrics to achieve the same things we’ll be discussing later. I’ll be using a B2B model as an example to explain how to report on Average Product Detail page views for those who don’t have Enhanced eCommerce implemented.
In this post, we’ll be discussing how to calculate the Average Product Detail page views before the actual conversion. Since we focus our discussion mainly around B2B solutions, let’s assume the main conversion is a lead generation form submission. But, first things first — why should we care about this metric?
Why Should We Care?
The Average Product Detail page per user calculated metric will provide insight on user behavior and help us understand how many product detail pages on average users view per conversion. Further, we will use this metric in combination with the conversation data. We’ll compare the calculated metric for those users who converted and didn’t convert for lead scoring.
The average PDP views metric will provide help to answer the following questions:
Do more product page views mean more conversions? This information can be used for remarketing experiments and increasing spend to target the audience who viewed a large number of product pages but didn’t convert. (Idea: if you have a large number of PDP views, this means that users are comparing products. A good thing would be to add a comparison tool to help users compare more efficiently).
Do we need to increase PDP views for those users who don’t convert to the amount of PDP views of those who convert? The goal is to increase conversions, so of course.
Do our average PDP views go up with adding the Recommended Products section on the website and did it increase the conversion rate? This one is especially useful if you have Recommended Products block on a product detail page.
What do we need to do to get the answers?
- Set up two calculated metrics: Average Product Detail page views per conversion and per user.
- Set up two custom metrics: product detail page views and lead gen form submissions.
- Set up an event to track the product detail page views.
- Build the report with calculated and custom metrics.
- Create two segments to analyze the data for new users who converted vs. new users who didn’t convert.
How Do We Do This?
I’ll describe two calculated metrics for the average PDP views: per conversion and per user. Let’s look at what the difference is between these two metrics.
Average PDP views per conversion metric shows how many product detail pages users see per conversion on the website. It doesn’t tie to users. In turn, Average PDP views per user metric answers the same questions but it does tie to a user and can be used for creating remarketing audiences based on the users who viewed PDP but didn’t convert, for example.
We’ll take our investigation even further and set up a report to see the numbers specifically for new users who converted and didn’t convert. This will give us a better understanding of user behavior for those who come to our website looking for our product/service.
First, we need to create a regular expression to group all the product detail pages we have on the website. I’ll be using Bounteous Public Trainings as product examples, but you should use a product example relevant for your business. You can check All Pages report in Google Analytics to see the product detail page paths.
The regular expression is the following:
.*training\/(boston|chicago|los-angeles|minneapolis|nashville|new-york-city|pittsburgh|san-francisco|toronto|washington-dc).*
Hopefully, for your site, there is some pattern for PDPs that can be easily identified.
Creating Custom Metrics
Please note: Custom metrics are set on property level, meaning you’ll see custom metrics in any view of that property where you created them. You can set up to 20 custom metrics for a standard version of Google Analytics and up to 200 custom metrics for a premium GA360 version.
Calculated metrics, in turn, get created on a view level. It means that if you see that calculated metric only in a view, you created it. You can set up to five calculated metrics per view in a standard GA version and 50 calculated metrics per view in GA360 version.
While we are in Google Analytics, we need to create a custom metric and add it to the tag in Google Tag Manager so it will show the numeric value for each viewed product detail page. We will use this custom metric in the report to analyze data.
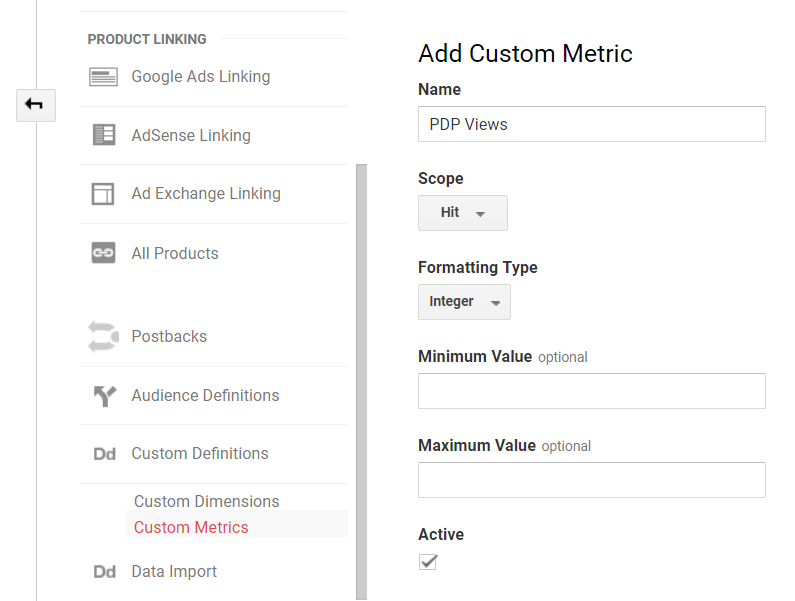
Navigate in your Google Analytics account to Custom Metrics (Admin > Property Column > Custom Definitions > Custom Metrics), click on + New Custom Metric button, add the name, check the values to make sure it is all valid and the Active box is checked. The custom metric is of a hit scope and integer type to show a numeric value of every product detail page view instance.
After you create a custom metric, remember (or write down) its index number. It is unique for each metric. We will use that number to “activate” the custom metric in Google Tag Manager. In my case, it is Index 1.
We’ll need another custom metric that shows the conversions. For example, the main conversion for your site after a user views the product pages is a form submission. You’ll need to create the metric the same way we did PDP Views custom metric and then add its index number to your form submission event in Google Tag Manager. The metric would also be of a hit scope and integer type.
In the end, you’ll have two new custom metrics in Google Analytics.
Create an Event in Google Tag Manager
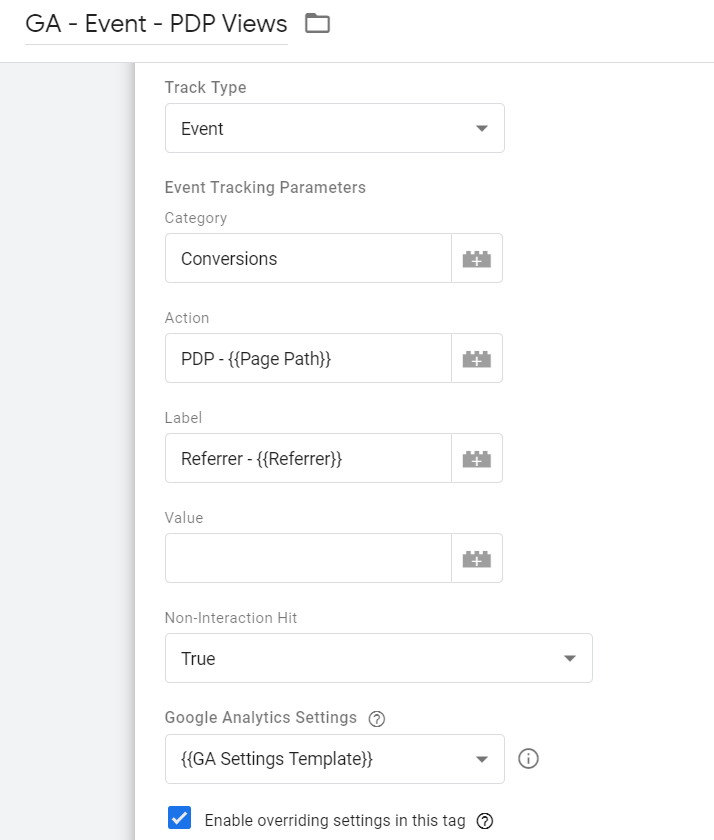
Next, we’ll need to create an event in Google Tag Manager to fire every time a user views a product detail page. I chose the following Event Category/Action/Label for the event, but feel free to include the naming conventions that make most sense to you. If you don’t want to set up a separate event for PDP views, you could add the custom metric to the pageview tag instead and filter the reports to identify the product detail pages.
Also, please note that I set up this event as non-interaction so it won’t affect the bounce rate.
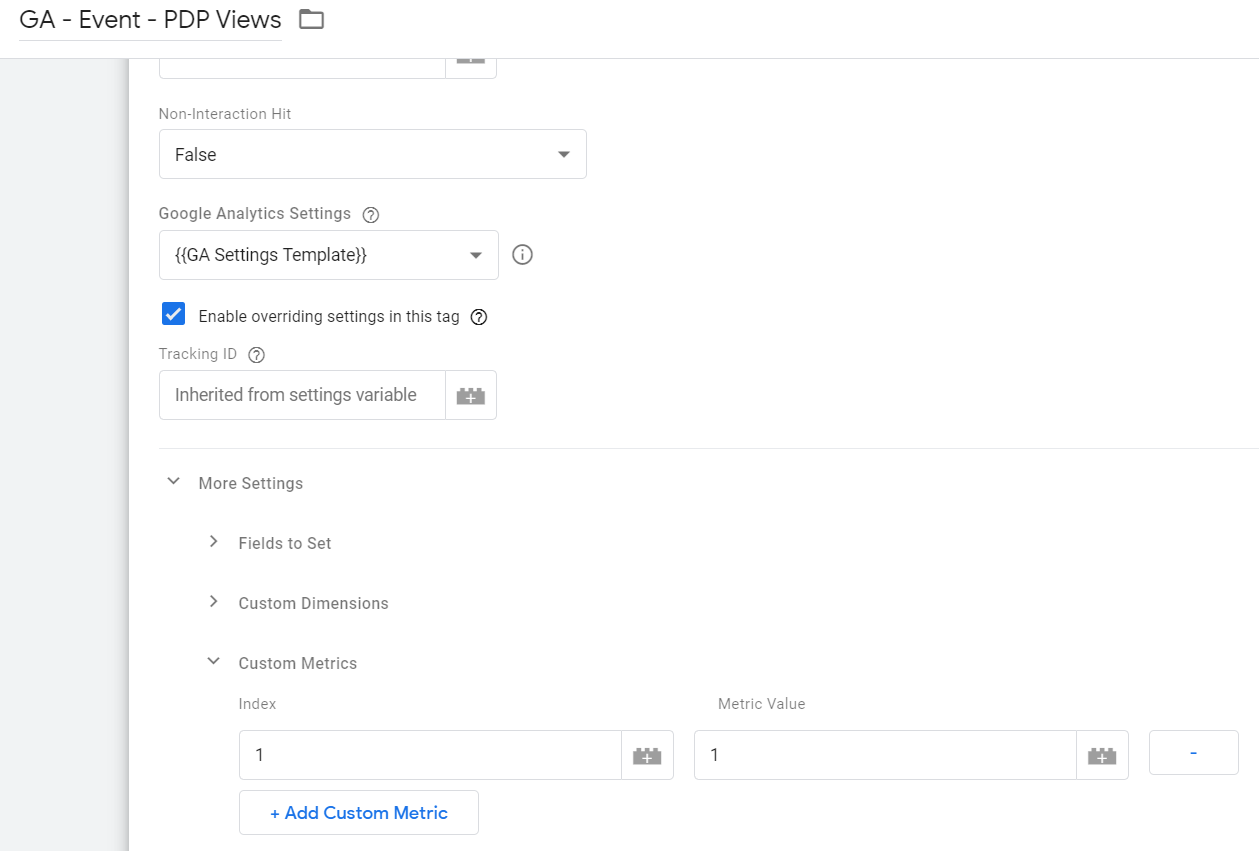
In the PDP Views tag, check the Enable overriding settings in this tag box, expand More Settings, and then expand Custom Metrics. We will put the index number into the Index field (include the appropriate index number of your custom metric) and type “1” into Metric Value field. This means that if a user views a product detail page, the numeric value will be assigned to that page and will be incremented by one with each view.
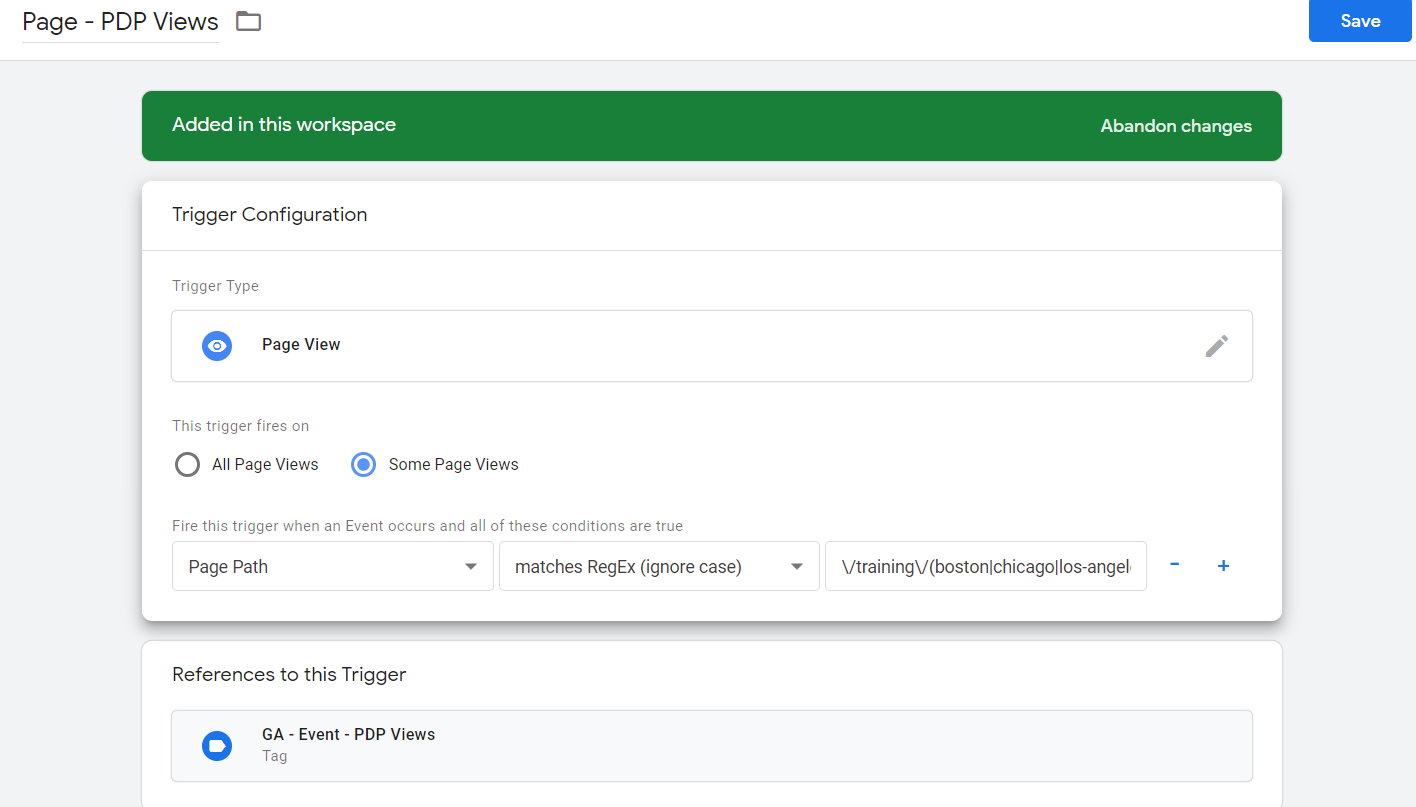
The trigger type for this event is going to be a pageview with the condition of page path. We need to copy and paste the regular expression that we created before into the Page Path condition box.
Great! Now, add the Register Form Submissions custom metric to your form submission tag the same way we did for PDP Views tag. Test the events and check the metrics value in the GTM Debug Console. After testing and making sure everything is working correctly, go ahead and publish the changes.
Average Product Detail Page Views Per Conversion
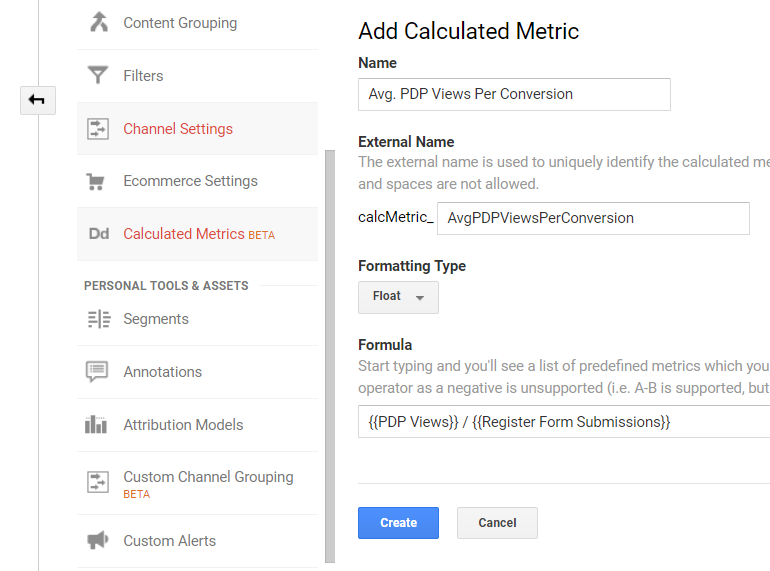
Next, we’ll need to create a calculated metric to show the Average Product Detail page views per conversion. In Google Analytics, navigate to Admin > View Column > Calculated Metrics.
I named the calculated metric “Avg. PDP Views Per Conversion,” assuming that conversion is the Register form submission, and would recommend you follow a similar naming format that helps identify the conversion you are tracking. The metric type would be float to include decimals. The formula is using the two custom metrics we previously created, PDP Views divided by Register Form Submissions custom metric.
This calculated metric helps you understand how many product detail pages users who convert (or in our case, submit the lead gen form) view. This metric is good, but we are going to dig deeper with the data to uncover even cooler insight.
Average Product Detail Page Views Per User
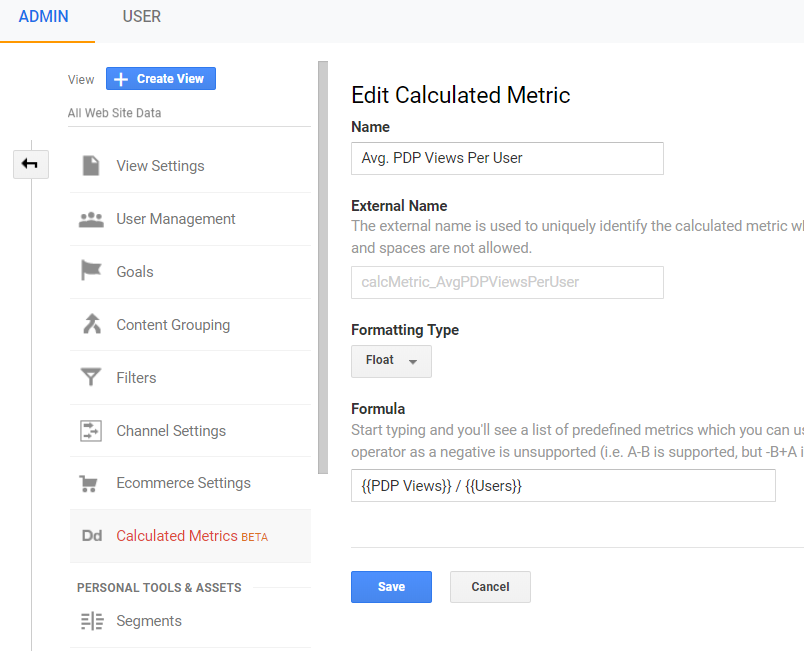
The second calculated metric we are going to create is Average PDP Views per User. The formula for this metric is PDP Views divided by Users.
Awesome! We are one step closer to uncovering some great insight!
Create Segments
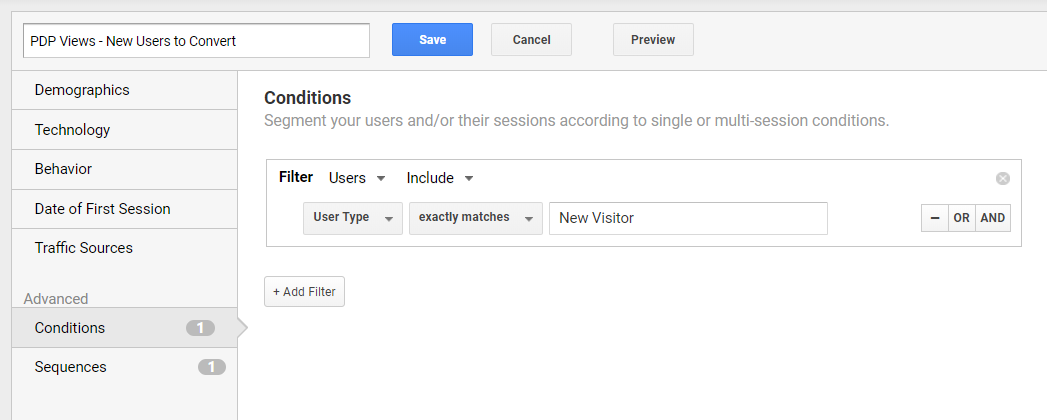
The next thing we’ll do is create a segment that sorts the data by new users who viewed the product detail pages first and then submitted the form. In the segment settings, go to Conditions and set it to “User Type exactly matches New Visitor.”
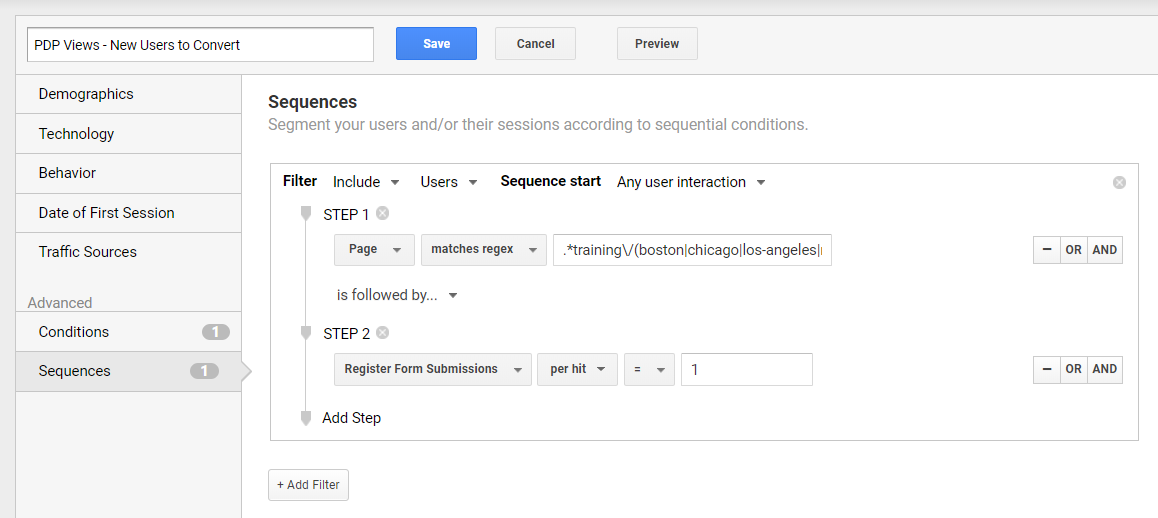
Then, go to Sequences and filter by Users. We need to set up a sequence to ensure that users view a PDP and only after that submitted a form for the first time. The first step would be any product detail page, copy and paste your regular expression here. The second step is the form submit custom metric set to equal 1 per hit. This way, the data is going to be segmented to show data for users who viewed product detail pages and then submitted our lead gen form for the first time.
Such sequence doesn’t mean that users need to view a PDP as a first action within a session and immediately after that submit a form. Our segment will sort the data by new users who viewed product detail pages at some point, maybe within multiple sessions, and then submitted a form for the first time.
As an option, a similar sequence segment can be created to include not only new users, but all users who viewed PDP and submitted a form. With these two segments, you could compare average PDP views per user vs. per new user metrics.
The segment conditions for New Users Did Not Convert are the following:
- User Type exactly matches New Visitor AND
- Register Form Submissions per user = 0 AND
- Page matches regex that we built in the beginning for the product detail pages.
View Your Custom Reports
*Please note this data is from my personal GA account and is not actual data from Bounteous.
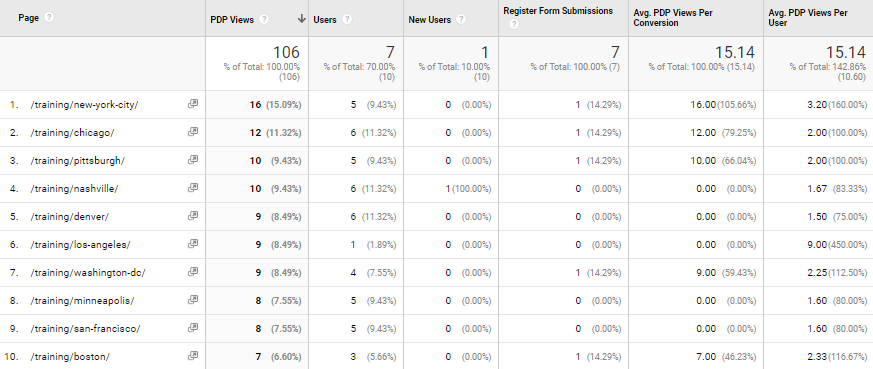
This is the custom report with our custom and calculated metrics. It’s interesting to note that Average PDP Views Per Conversion and Average PDP Views Per User calculated metrics have the same value. This is not common, and in your case, it could be different.
This report provides you with insight into how your product detail pages perform per conversion and per user. But, it is not enough to make data-driven decisions. In our next step, we’ll apply two segments for new users who converted and who didn’t.
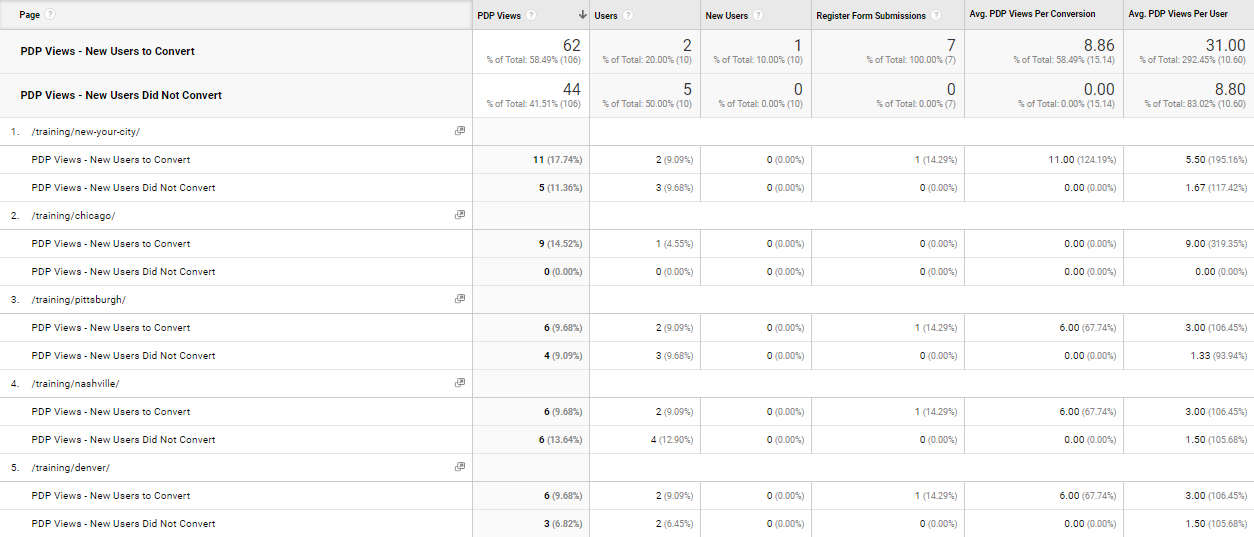
*Please note this data is from my personal GA account and is not actual data from Bounteous.
Fantastic! With such report, we’ll be able to analyze how many product detail pages new users view before submitting a form (=converting). We can see that those users who convert view more product pages than those who don’t convert. These metrics help us understand how each product detail page performs, what pages drive the most conversions, and how many product detail pages it takes for users to convert.
Further Actions We Can We Take with This Data
Beyond just having more information to work with, Average Product Page Views can give us actionable tools to use to drive more business. Consider the following items as a mix of both reporting and todos that are enabled by adding this extra tracking.
As the next steps, we could do the following:
- Analyze the difference in numbers between new users vs. all users to convert.
- Analyze the metrics on the session level to see what the differences in the user behavior are on the session-level.
- Look at Days to Conversion in Multi-Channel Funnel reports to understand the sales cycle.
- Set up an audience for new users who viewed multiple PDPs but didn’t convert and retarget to them.
- Add recommendations links to check other products similar to those other users viewed before completing a purchase. Especially useful would be to add links to the products that are purchased the most and more popular among your audience on those product detail pages that have the least conversions. This way, you could help those users who hesitate decide faster. You could see if it is working by comparing the conversion numbers for those products before and after the recommended products section implementation.
With so much information at our fingertips and flexible tools like Google Tag Manager and Google Analytics, it’s important to identify the pieces of information that can help us take our eCommerce strategy to the next level. Average Product Page Views may not be a silver bullet, but can complement the existing eCommerce reports that are available by default within Google Analytics and augment our strategy and insights we derive from users on our website.
