Analytics Goal Workshop, Part 3: Engage With Events
The quest for conversion data continues!

Previously in part 2 of the goal workshop we looked at how to set up URL destination goals. You identify important pages on your site and count a conversion when a visitor views one of those pages.
Now it’s time to move beyond pageviews and look at conversions that come from other visitor actions – especially actions that might be good indicators of visitor engagement. In Google Analytics you can track almost any action as an event, and then set events as goals. Follow the steps below to start turning visitor actions into conversion data.
Step 1: Define visitor engagement with events
The easiest goals to set up in Google Analytics are the basic engagement goals for time spent or pages viewed. A more effective measure of visitor engagement looks at the actions your visitors took. Did they use a free tool or resource, watch a video, or play a game? Did they leave a comment or rating? Did they click on an important external link?
Event tracking lets you define visitor actions like these with up to 4 pieces of information called category, action, label, and value. Use any of those pieces alone or combine them to configure a goal in Google Analytics.
You’ll have to add tracking code for events if you’re not already sending event data to GA. See the official Event Tracking Guide for details about implementing this code.
But first take a look at the event data you may already have.

Step 2: Review existing data and assess data needs
Take a moment to review what’s in your Google Analytics data. Even if you’re fairly certain what events you’re tracking, you want to see how they appear in the reports in order to set up the proper goal conditions in the next step.
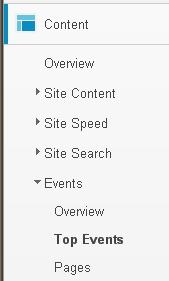
Go to Content > Events > Top Events and drill down through each category. Make a note of the hierarchy of categories, actions, labels, and values (if you have any).
Do you want to continue with the existing event data? Or do you need a new implementation to cover the types of visitor actions you want to set as goals? You may be able to work with some or all of the event data you currently collect, and possibly supplement it with new data.
Here are a few examples of event tracking schemes that allow you to zero in on important actions and set up better engagement goals.
Example A: Use a free web-based tool that allows the selection of multiple options, such as a calculator or scheduler or directory lookup
Event Category: calculator (tool name)
Event Actions: option-a, option-b, etc. (use actual names of options)
Event Labels: option-a-choice-1, option-a-choice-2, etc. (if you need this granularity)
Event labels and values are optional. You can always omit them if they don’t add useful information.
Example B: Use a review system to read or write a review, possibly including a rating of the product or service, or vote to rate the helpfulness of a review
Event Category: reviews
Event Actions: read-review, write-review, rate-product, rate-review
Event Labels: name of product reviewed (or broader group like product type)
Event Value: product rating (or rating of the review’s helpfulness)
Event values must be whole numbers (integers) – values like 72.34 or 1:10 are not allowed. Negative numbers are not allowed. If a rating is simply “thumbs up” or “thumbs down” you could put that in the label, or use 1 and 0 in the value.
Example C: Click an external link to a sister site or third-party site where you don’t have tracking code for your GA account, such as a registration site
Event Category: external-links (or more descriptive name for the type of links)
Event Actions: the external URL (target of the link or descriptive name)
Notice that you can assign any type of description, not strictly an action, to the parameter for event actions. Assign each parameter whatever benefits the hierarchy when setting up your event tracking scheme.
After you review your existing event data and assess your data needs, you’ll either pause here to implement additional event tracking code, or proceed directly to the next step.
Step 3: Enter the event conditions
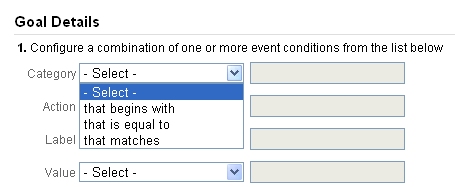
In the first part of the setup under Goal Details you can enter one or more event conditions based on the four event parameters – category, action, label, and value. Make sure you enter a condition based on what you see in your event data (or what you plan to implement).

Whenever you enter a condition, you must choose a match type. These correspond to the match types used in URL Destination goals even though they have slightly different names:
that begins with = Head Match
that is equal to = Exact Match
that matches = Regular Expression Match
You’ll probably use “that is equal to” (Exact Match) most of the time. But you can use “that begins with” (Head Match) to roll up cleverly named event parameters. In example A, if you want to set a goal for visitors choosing options named rate-fixed or rate-variable, you can match either of them in one condition with Event Action that begins with rate:

And you can use “that matches” (Regular Expression Match) to roll up completely different names for any parameter. The most common way is to string the names together with the pipe (vertical bar above the enter key). In example C, if you want to match URL descriptions like “registration” or “accommodations”, then enter Event Action that matches registration|accommodations:

Read more about match types and regular expressions in part 2 of the goal workshop and in our free eBook on regular expressions.
You can also base an event condition on the event value, which has slightly different match types. Since event value is an integer, the match types are simply greater than, less than, or equal to. In Example B, if you want to set a goal for ratings of 4 or 5 stars, you can set Event Value that is greater than 3.

A couple words of warning about event conditions:
Be careful when using single event conditions. For example, if you have event actions or labels that cut across categories, you must specify multiple conditions. To check this, go to Top Events and (instead of drilling down through the category and action) switch the Primary Dimension to Event Action or Event Label. Then drill through the action or label you’re considering to see if it’s contained in more than one category.
You can set up an event goal before the data actually appears, but you’ll want to be sure the parameters are implemented exactly the way you set them up in the goal. Double-check your Top Events report after implementing code just in case a hyphen or plural or other variation occurs.
Step 4: Enter a goal value or use the event value
Just as with URL Destination goals, it’s a good idea to enter a goal value when setting up event goals. Estimate an imputed value if you can or use a point system for more or less important goals. For example, you may find that a certain percentage of events lead to registrations (that have a monetary value). Or you may give writing reviews more points than reading reviews.
Or use the third option, available only with event goals: Tell Google Analytics to use the event value as the value of the goal. If your goal is to track ratings of 4 or 5 stars as in example B, let the goal value be the event value (4 or 5, as the case may be) by choosing “Use the actual Event Value” as shown below.

Remember one goal’s values are added to all the other goals’ values within the goal set tabs (see “Per Visit Goal Value” on the scorecard) and across all goals in the multi-channel funnel reports (see “Conversion Value”). So it makes sense to organize separate goal sets, or even separate profiles, for goals valued quite differently. That way you can avoid mixing (a) goal values based on actual event values (or monetary amounts) with (b) goal values based on a weighted points system.
Step 5: Use virtual pageviews for funnels
Unfortunately, you can’t build funnels out of event conditions, and you can’t mix event conditions and URLs in funnel steps. But you can fall back on the method used before event goals were available – Virtual Pageviews.
Instead of tracking an event at the point a visitor takes action, you track a second “pageview” and give it an imaginary URL. The patterns of your imaginary URLs can have a hierarchy like an event scheme, for example: /vpv/review/rate-product/product-x. And then you can enter them in funnel steps and even mix them in steps with real URLs.
Of course, imaginary URLs show up in your Content reports just like real URLs so you’ll want to filter them out of profiles where you analyze real page data, and put your funnels in a separate profile set aside for that purpose. For easy filtering, give them all a common prefix like “vpv” (for virtual pageview).
Google Analytics event tracking expands the possibilities for collecting conversion data, no matter what type of web site you have. Start with a goal plan, add page goals, and then add events (or virtual pageviews) for a more complete picture of visitor engagement.
The goal of this workshop was to convince you implement accurate and actionable goals in Google Analytics. Did I succeed? What questions remain? Please share in the comments.


