Email Tracking In Google Analytics With MailChimp
This is Part 1 of a 2-part series. >> Part 2
The Problem:
You have some data about your email marketing (for example, open rate) in your email marketing software, and data about visits to your site from email marketing elsewhere (namely, Google Analytics).
Wouldn’t it be great to see an end-to-end view of all that data in one place? With Universal Analytics and the Measurement Protocol, you can, and I’ll show you how, step-by-step.
Today’s post will kick things off by looking first at how to track email opens in Google Analytics. My next post will show how to tag a visitor with a unique ID, so you’ll be able to track them across devices (like in the image below). Finally, we’ll tie it all together so you can see visitor behavior from opening your email to visiting your site and (hopefully!) converting.

The Solution:
We’ll use MailChimp – a popular (and free, if you want to play along) email marketing manager to walk you through how to set this up, but you should be able to apply the same steps to any email marketing solution you use.
* Disclosure: LunaMetrics uses MailChimp to power our email marketing. However, this post was written independently, without their knowledge or input.
I’ll assume you are comfortable working with UTM campaign parameters to track your marketing activities (you’ll need to know this). For a refresher, check out the following articles:
About Custom Campaigns – Google Analytics Help Center
Best Practices for Creating Custom Campaigns – Google Analytics Help Center
4 Steps to Better Campaign Data in Google Analytics – Dorcas Alexander / LunaMetrics
Google Analytics Campaign Tagging Tool – Jim Gianoglio / LunaMetrics
Step 1:
First things first. You’ll need to create a new custom metric in the Google Analytics admin interface for your Web Property.
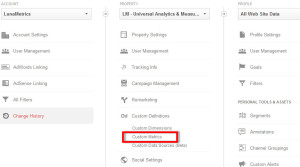
Log in to Google Analytics, and click on Admin in the top right. Select the appropriate Account and Web Property, and click on Custom Definitions under the Web Property column. Then click on Custom Metrics.
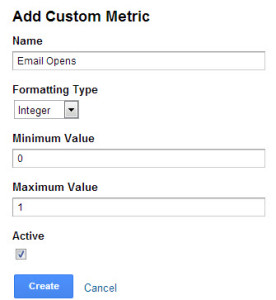
In the next window, click on the New Custom Metric button, and give your custom metric a name, formatting type, minimum and maximum value, and make sure the box is checked for Active. I recommend the setting shown below:
Step 2:
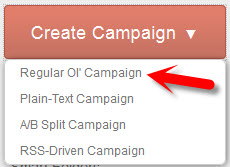
Next, you’ll need to log into MailChimp (or whatever you’re using) and start a new email campaign. For our example, we’ll use the “Regular Ol’ Campaign” option.
Step 3:
Start by following the wizard in MailChimp – it’s a series of 5 steps to launch your campaign:

Do the first two – Recipients and Setup – this is where you decide which list your sending to and some other basic information, like subject line, reply-to email address, etc.
Step 4:
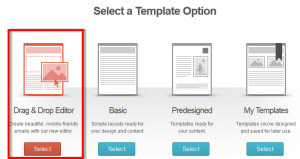
Design your email. This is where you choose your template, or work from scratch, to create the content of your email. If you want to follow along with this example, select the Drag & Drop Editor.
Step 5:
Choose a template to get started, then create your email. Include all the images, headlines, text, and buttons that will make your list subscribers sing your praises, click on your links and buy your products.
Step 6:
Now the good part. You need to add a Text content block to your email. I suggest at the bottom, but anywhere will work.
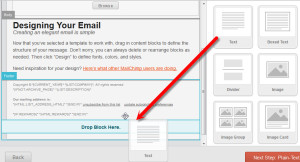
Now you need to edit the content of this block. Click on the angled brackets icon (pictured below) to edit this content in code view.
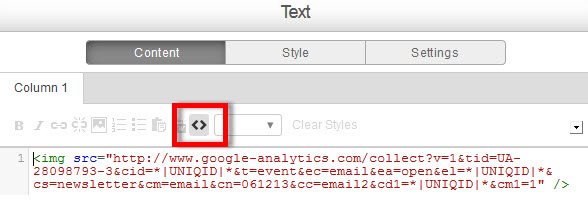
This is where the magic happens – you ready? Put in the following:
<img src=”http://www.google-analytics.com/collect?v=1&tid=UA-XXXXXXX-YY&cid=*|UNI…; />
Let me break that down for you.
<img src= … Basically, you’re fooling the email into thinking it has to load an image. There’s no real image file, but the source that we specify is the GET request that sends our data to Google Analytics. So when your email tries to fetch the “image,” it’s actually sending the data for you. Keep in mind, the email recipient has to allow images for this to work.
http://www.google-analytics.com/collect? This is the API endpoint for the Measurement Protocol. In layman’s terms, this is where we’re sending the data. The data that’s being sent comes next, in the form of query parameters.
v = 1 Protocol Version (required)
tid = UA-XXXXXX-YY Tracking ID / Web Property ID (required)
cid = *|UNIQID|* Client ID (required). This anonymously identifies a particular user, device, or browser. The value – *|UNIQID|* – is a dynamic parameter (aka merge tag) in MailChimp that will fill in the user’s MailChimp ID.
t = event Hit type (required). We’re tracking this with event tracking, hence the event hit type.
ec = email Event Category
ea = open Event Action
el = *|UNIQID|* Event Label
cs = newsletter Campaign Source
cm = email Campaign Medium
cn = 062413 Campaign Name
cm1 = 1 Custom Metric 1
You can learn more about these parameters by reading up on the Measurement Protocol Parameter Reference guide.
Keep in mind, you want to be consistent in your naming conventions for your campaign source, medium and content. Any links in your email that go to your site should be tagged with the same source, medium and campaign as above. Following the example above, your links would be tagged as follows:
www.mysite.com/landing-page/?utm_source=newsletter&utm_medium=email&utm…
Step 7:
Finish the remaining steps of the email campaign wizard (Plain-Text and Confirm) and send out that email!
Step 8: (optional)
Log into Google Analytics and open up your Real Time reports to see people opening your emails in real time. Can I get a “woop-woop?”
The results:
Now, when someone opens up your email, it will record an Email Open as a metric, and you’ll see this showing up in your event tracking reports:

In Part 2, I show you how to connect visits from the same visitor across devices. This will let you see if John Doe opened your email on his phone, then later visited your site from a link in the email on his desktop, then came to your site from a paid search ad on his tablet.


