SEO Reporting With Google Tag Manager

This has been a big year for keyword (not provided). It has become more difficult than ever to gauge the success of SEO campaigns. That single term is now showing for over 95% of LunaMetrics.com’s organic search traffic! Yikes!
Our SEO team has been hard at work finding ways to get back some of that keyword data, through Webmaster Tools, AdWords, and some fancy mathetmatizing. Reid Bandremer blogged about some ways to combat (not provided) in a post in October.
But what if we could do even better? Rather than focusing on a user’s search term, what if we could see, on a page-by-page basis inside Google Analytics, exactly which keywords we optimized those pages for? Then we’d be able to see which of our actual SEO keywords are performing best, using metrics like conversions, bounce rates, time-on-page, etc.
The following is a way to get optimized keyword data inside Google Analytics, across your entire website, using Google Tag Manager.
The optimized keyword is defined according to a set of rules that we control. Our script will try to identify the optimized SEO keyword of each page, by checking these items in the following order:
- Manual dataLayer definition (if it exists)
- One-to-one URL lookup (if it’s defined)
- Meta keywords (if it’s on the page)
- H1 tag (if it’s on the page)
For this recipe, you’ll need:
- Google Tag Manager, across your site
- 1 Universal Analytics property (with Edit permission at the property level)
- 1 available Custom Dimension in Universal Analytics
- Several live organic search listings
- Optional: jQuery
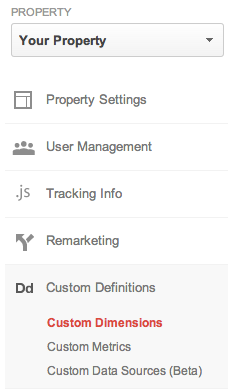
Ok! Inside Google Analytics, in our Universal Analytics property, we’re going to add a new custom dimension. You’ll do so in the Admin section, under “Custom Definitions”.
Custom dimensions are unique to Universal Analytics, and they allow us to define our own custom Analytics dimensions that we want to record, in a similar way to the old custom variables of yore.
We’re going to create a custom dimension called “Optimized Keyword”. It is critical that the scope be set to session, for reasons that we’ll see later.
This may be your first custom dimension, or you may have other dimensions defined. For most users, you’ll have 20 maximum dimensions you can create (though Premium users have up to 200!). At any rate, make note of the “Index”. In our example, this is the first custom dimension, so the Index is 1.

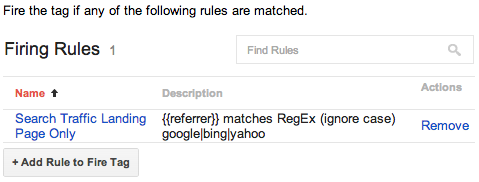
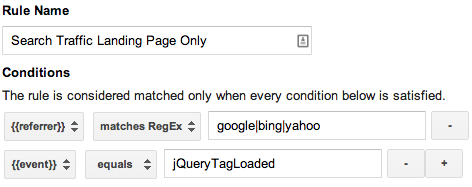
Now on to Google Tag Manager. We’re going to create a new rule called “Search Traffic Landing Page Only”. This rule will have one Condition, based on the HTTP referrer. It will only fire when the {{referrer}} macro matches a regular expression that includes one of the search engines we’re optimizing for. In other words, it will only fire when a person arrives on our site from a search engine. See below:

Those “|” are “pipes” separating the search engines we want to target, all lowercase. In this example, we’re using google|bing|yahoo .
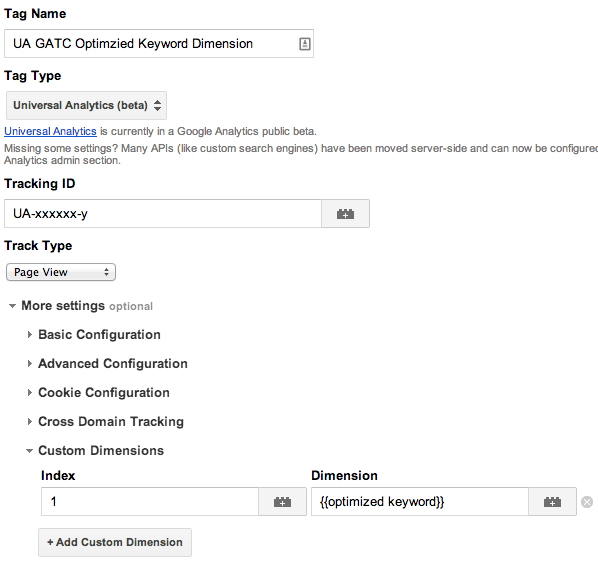
Now we’re going to create a new tag, called “UA GATC Optimized Keyword Dimension”. The tag will be of tag type “Universal Analytics (beta)”. Fill in the tracking ID to match the UA-ID of your Universal Analytics property. Choose tracking type “Page View”.
Then under More Settings, under Custom Dimensions, we’re going to add a new dimension. We’ll set the Index for this custom dimension to the Index from above (in this example, it is simply 1). For the Dimension’s value, we’re going to type in a reference to a macro that doesn’t exist just yet: {{optimized keyword}} . Those braces are mandatory.
Don’t forget the Firing Rule! We want to apply the rule “Search Traffic Landing Page Only” from above.
Save this tag!
Important note for those who are already implementing Universal Analytics using Tag Manager: If this is an existing Google Tag Manager implementation, and you are already running Universal Analytics, you will need to ensure that you also add a Blocking Rule for “Search Traffic Landing Page Only” on the main tag that includes Universal Analytics. Otherwise you will have two tags firing when a person arrives from a search engine!
Now on to the macros! This is where the magic happens.
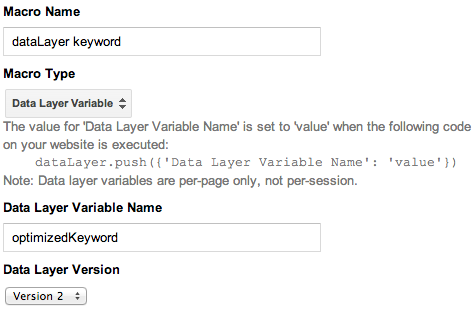
Create a new macro called {{dataLayer keyword}}. The Data Layer Variable Name is “optimizedKeyword”.
Now create a second new macro called “optimized keyword” (lowercase). Select macro type “Custom JavaScript”. The contents of this macro will be as follows:
function() {
// IS THE KEYWORD DEFINED IN THE DATALAYER?
if (‘{{dataLayer keyword}}’!=’undefined’) return ‘{{dataLayer keyword}}’;
// IS THE KEYWORD DEFINED IN THE DICTIONARY?
else if (‘{{url}}’==’http://www.mysite.com/page1.html’) return ‘my keyword one’;
else if (‘{{url}}’==’http://www.mysite.com/page2.html’) return ‘my keyword two’;
else if (‘{{url}}’==’http://www.mysite.com/page3.html’) return ‘my keyword three’;
// USE THE META KEYWORD
else if ($(“meta[name=’keywords’]”).attr(“content”)) return $(“meta[name=’keywords’]”).attr(“content”);
// USE THE H1
else if ($(“h1:eq(0)”)) return $(“h1:eq(0)”).text();
}
Important: These last two options above (meta keyword and H1) presuppose that you have jQuery on the page, and that is available to the macro. The best way to do this is to include jQuery in its own Custom JavaScript tag inside Tag Manager, and then fire a dataLayer event, like so:
Then you would modify your “Search Traffic Landing Page Only” Rule from above, to add an additional condition to wait for the dataLayer variable, like so:
This macro will walk through the page and look for each item, in order. The first thing it checks for is a dataLayer variable on each page, called “optimizedKeyword”. This is the most specific way to define an SEO keyword on a page. You’ll need to modify your source code on a page-by-page basis to add this code in the <head> section:
This is ideal for small sites where you have control over the source code — but if the optimizedKeyword variable is not defined, our code just skips it!
Next, our code checks the current URL against a list of URLs and sees if there is a keyword defined for that page. If so, the script uses that keyword. Tweak the “Dictionary” section of the code above to fit your site’s particular needs.
The code will then move on to check the meta description and H1, in that order. If it can’t find either, there will not be an optimized keyword defined on that landing page.
That’s it! Create a version of your Google Tag Manager and publish your new container! Then wait for the data to start rolling in.
Results
The final result of all that hard work? Great SEO reporting inside Google Analytics!
Navigate to the Organic Keywords report, and apply a Secondary Dimension of Optimized Keyword.
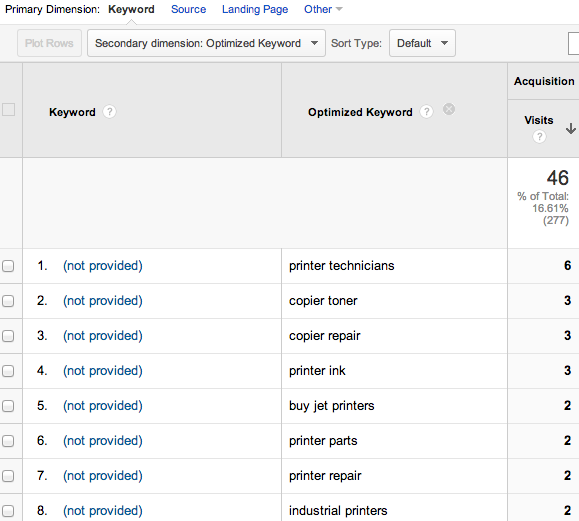
Look at all that beautiful data! Take that, (not provided)!
How about conducting a detailed landing page analysis? Navigate to the Landing Pages report, and apply a Secondary Dimension of Optimized Keyword.

Or Goals! Apply a secondary dimension in the Goals reports to see how your optimized keywords are affecting conversions!

I hope you find this helpful! Enjoy!


