Implementing Google Authorship
What is rel=”author”?
Part of the HTML5 spec, rel=”author” can be added to any <link>, <a> or <area> tag to inform search engines that the other end of the author link represents the author of the piece of content it is crawling.
In 2011 Google began using rel=”author” in an attempt to understand authorship of content more broadly. There has been some turbulence in the SEO community over whether Google will actually be using this to rank content in future. But Google’s Matt Cutts has most recently stated that Google is using rel=”author” as part of an Author Rank when serving in depth articles in their search results. Thus it is important to know you have this set up properly on your website.
Reasons for Authorship
• Allows writers to claim the content they contribute to one or more websites
• Allows searchers to find more content written by the same writer
• Adds credibility and legitimacy to web content
• It’s the first step toward verifying an author’s authority which is used in Author Rank
• Pages receive higher click through rates due to the inclusion of a head shot alongside search results
Ways to Implement Google Authorship
Google uses a kind of bidirectional linking to verify that you are actually the author of a piece of content. This prevents people from falsely representing you as the author of content. For it to work you must include a link to your Google Plus profile somewhere on the page. It’s really as simple as adding a regular link with the rel=”author” tag somewhere on your page. When set up properly it allows Google to collect the articles you write from all the websites you contribute to and make them available to users interested in seeing what else you have written.
The fool proof way to implement the author link is to wrap a user head shot in the link or to use the authors name as anchor text somewhere on the page. Note that a linked image plays no role in the SERPs, Google uses your Google+ head shot for that. This is especially handy when you don’t have control of the website.
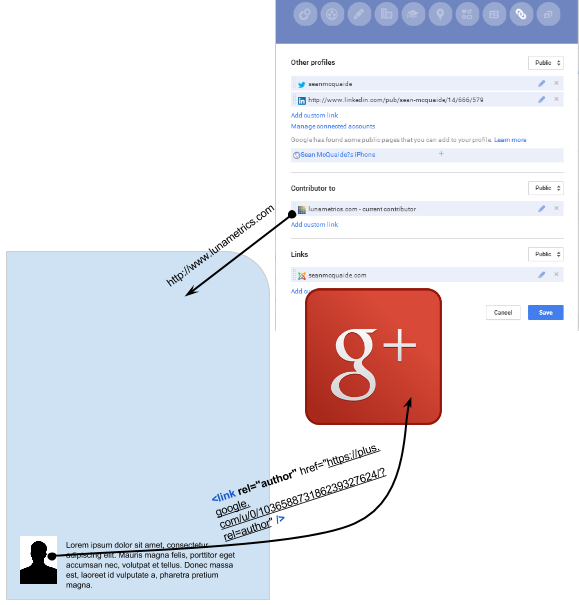
You must include a link containing the rel=”author” attribute from the piece of content you produced to your Google+ profile. The link should look something like this:
<a rel=”author” href=”https://plus.google.com/u/0/103658873186239327624/?rel=author“></a>
Then you must verify that you are a contributor to that domain by adding the domain to the “Contributor To” section of your Google+ profile. Visually the process looks like this.

Below I have added some detail to Googles Official directions for implementing this.
1. Set up authorship by linking your content to your Google+ profile
a.Create a link to your Google+ profile from the article webpage.
– Ex: <a href=”https://plus.google.com/103658873186239327624/?rel=author”>Sean McQuaide</a>
– You are able to wrap this link around an image if you like. Doesn’t matter to Google, as long as the link is on the page.
b. Add a reciprocal link from your profile to the site you contribute to.
i. Edit Contributors Section by using this link, or navigate to it by:
1) Going to your G+ profile
2) Click ‘About’
3) Scroll to links section
4) Click ‘Edit’
5) Under “Contributor To” click ‘Add’ custom link, and enter the website URL.
-You can change the visibility of “Contributors To” by using the drop down in the upper right
Another way of connecting your profile is to verify an email address from the domain as your content (e.g. you@funnyordie.com). Here are the Google instructions for this, they are very simple.
- Check that you have an email that matches the domain of the site you contribute to
- Make sure each article you authored has a clear byline (ex: By Sean McQuaide) identifying you
- Submit your email address to Google via the Authorship page
- The domain of the email will now appear in the “Contributor To” section of your Google+ profile.
- Check the markup with Googles structured data testing tool

Via this method you will see the websites favicon along with the name of the site in your Google+ Contributor To settings.
Choosing which way you go about setting up authorship depends on the kind of access you have to the website you’re writing for. If you have an email address from the website you’re writing for, then the second option is going to be the easiest way for you to get up and running. Just make sure your byline matches your Google+ profile name exactly. If you do not have control over things like the bio which would allow you to easily add a link to your profile, then you should use the first method to add your own byline at the end of your post and add the site manually in G+.
Leave questions in the comments.


