Google Tag Manager Basics: Links And Clicks
While Google Tag Manager touts itself as a code free alternative to website development, sometimes a knowledge of basic web mechanics (and a little bit of code!) can help make your setup go much easier!
Whether or not you’ve started using the new version of GTM, this post will help explain how to target clicks on specific html elements like links, images, or buttons.
1. Background – HTML Elements
Before getting into Google Tag Manager, it helps to understand what we’re dealing with. In the briefest of descriptions, websites as they appear on our screens are made up of HTML.
Let’s pretend that our kids are going out this year for Halloween, and we’ve dressed them up as little Matt Cutts and Justin Cutronis. We’ll pretend that they’ve gone out and are bringing back bags full of candy.
These candy bars are going to be our HTML Elements!


REAL WORLD TAKEAWAY
The pieces that make up the page, like the links, paragraphs of text, and buttons are called elements.
2. HTML Elements have Attributes
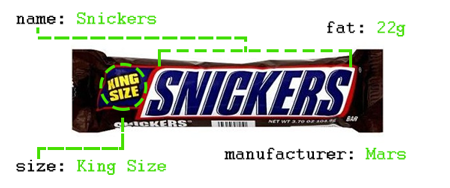
Each element has a list of certain attributes that describe certain parts of it. Let’s examine one of the candy bars that our kids have brought back.
Just by looking at a candy bar, you can guess at certain properties about the bars, like the type of bar or its size.

There may some additional attributes that we’d have to look closely to see, like expiration date or manufacturer.
Then there may be attributes that tell us about where the bars are located, like which bar did we grab first or whose bag they’re inside of.
To recap: some attributes are visible, some are hidden, and some are relational.
REAL WORLD TAKEAWAY
The HTML elements each have their own attributes that give us more detail about them. Some of the most common attributes that concern us are the following:
- ID – a unique identifier commonly placed on elements to assist with web development
- Classes – Non-unique classifications that affect how the element appears
Certain types of elements have different attributes, for instance: links also have an atrribute that tells us what url is being linked to.
3. Which Items Do We Care About
In the earlier days of the web, we used to mark the items we wanted to track with a little piece of code. Think about us going through our bag of candy and writing our name on the candy bars that we want to eat.

This works well, but quickly becomes unmanageable as we optimize our Halloween routes and amass tons of candy.
Thus, we’ve turned to creating rules to decide which ones we care about. Instead of saying, “I’ve marked all the candy bars that I care about,” we can now says things like, “I only care about Snickers or king size candy bars.”
Clearly this way of identifying candy bars is more scalable than our previous method.
REAL WORLD TAKEAWAY
Rather than saying, I’m going to decide which links I care about tracking on an individual basis, we’re able to make rules or triggers using an element’s attributes.
For instance, we can say things like “I want to track all links that end in .pdf” or perhaps something like “I want to track anytime an orange button is clicked!”
4. Listening for All Clicks
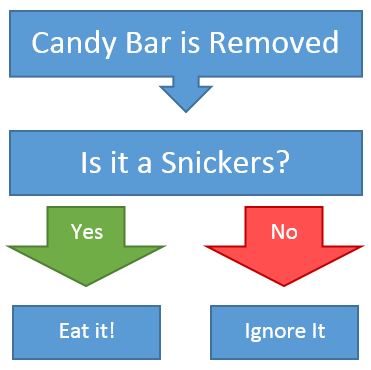
In order for these rules to work, we need to check each and every item. In our candy example, we can check each item as we remove them from the bag. So our process would look like this:

REAL WORLD TAKEAWAY
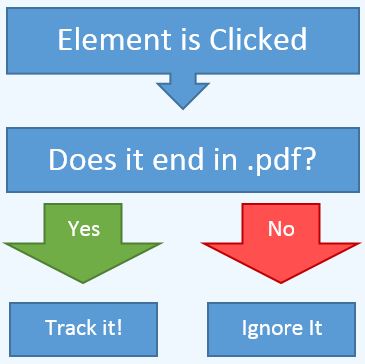
In Google Tag Manager, we can do the same thing. Our process will look like the following:

Note, this is where things get a little different between Google Tag Manager Version 1 and Version 2.
Version 1: We need to add an Event Listener Tag on any page that we want to listen for clicks. This is a special type of tag that we can fire on every page. It’s only job is to listen for when things are clicked.
Version 2: We don’t need to add a Listener Tag! When we create a rule that involves a click, GTM will automatically add the listener behind the scenes. We’ll get to the rule shortly.
We also have our choice of listeners, we can use either a Link Click listener or a Click listener.
5. Examining Each Clicked Item
Let’s say there are two people involved in the process, making a lean assembly line to help speed up our candy distribution. One person pulls a candy bar from the bag and places it on the table. They continue to remove candy bars, adding each one in a single-file line.
Meanwhile, the other person works as quickly as possible, looking at each candy bar in order and saying “Is this a Snickers?” As soon as they finish looking at one candy bar, they move onto the next candy bar that was removed from the bag.
In this case, our workflow can be described like the following:
Is the current candy bar’s name equal to Snickers?

REAL WORLD TAKEAWAY
Without going into too much technical detail, Google Tag Manager creates the same sort of assembly line. As you click on an HTML element, it saves that item to its own assembly line, called the data layer. The important takeaway is that each click will be processed in the order that it happened.
So instead of the current candy bar, we can say, let’s look at the current clicked item. We can do this using a Macro or Variable, depending on your GTM version.
In GTM, there a number of macros that are already created for us that help us with this process. The {{Click Element}} macro is the current element that we’re looking at, for instance, the current link. If I were to click on a multiple items, it would work through each one just like an assembly line.
From before, we know that this element has certain attributes, like the url. If we want to look at just the url, we can use a different macro to just pull out that specific attribute. That macro would look like {{Click URL}}.
So now, our rule looks like the following:
Does the current link’s url end in .pdf?
Does {{Click URL}} end in .pdf?
If we click on multiple items, each click will be evaluated in the order they were clicked on. We can use the same macro to examine each click.
These macros are called Auto-Event Variables, and can return a number of things out of the box, like: ID, Classes, Target, Text, and URL.
6. Putting It All Together
Here’s our real world application to bring it all together.
- Elements are pieces of content on a page, like links or images.
- Elements have attributes that we can use to decide if we care about them.
- In GTM Version 1, we add a Event Listener Tag to listen for all clicks. In Version 2, this is built in!
- We can check each item that comes in using an {{Click Element}} macro.
Once you understand how all the pieces fit together, it makes it much easier to start tracking clicks on various items on your site. The following is a more specific example.
- A link on your page may look like this:
Click here!
- In the above case:
ID equals “brochure-download”
Classes equals “dl-link orange”
URL equals “https://bounteous.com/download.pdf”
Text equals “Click here!” - We can use auto-event variable macros to get attributes from the current clicked item. For example:
{{Click ID}}
{{Click Classes}} - These macros can be used in Rules to determine when we want to fire specific Tags.
7. Common Questions
Q: How can I see the attributes of a certain element?
A: Examine the element using your browser
Most browsers have a built-in feature that allows you to examine certain items. This is a little more difficult, so you may want to reference the Chrome Web Developer Tools guide or the Safari developer tool guide. In Chrome, you can right-click on a link and select “Inspect Element.” This will highlight the item in the Elements tab.

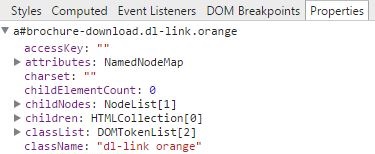
After you’ve selected an HTML element, you can look at the Properties tab to see the full list of attributes for that element.

Q: What if there isn’t a distinguishing attribute that I can use?
A: Look for relational attributes or add your own!
Now you’re in a bit of a bind. You can look to the element’s parent or children items (relational attributes), or you can add a unique ID or class to the element in order to make it distinguishable. Consider using custom data attributes!
Q: What if there isn’t an auto-event variable that I can use?
A: You can use a data layer variable macro instead!
The macro {{Click Element}} is the same thing as a data layer variable macro named “gtm.element.” If there’s something that’s not built into GTM, like the ID of an element’s parent, you can get to that using data layer variable that is equal to “gtm.element.parentNode.id.” This path can be found by following the chain in the Properties tab and expanding different attributes.


