Google Tag Manager Version 2 Triggers: What You Need To Know

Monday, March 30th, Google officially released a timeline for migrating Google Tag Manager Accounts from version 1 of the interface to version 2 (Or v1 and v2 for short). Version 1 users will have until June 1st to manually opt in to upgrading to the v2 interface. Starting June 1st, Accounts not yet in the v2 interface will be automatically migrated.
For more on what to expect in terms of the migration, check out the official documentation on the upgrade or Simo Ahava’s blog on the migration process. If you’d like to learn more about all of the changes in v2, refer to Jonathan Weber’s post on the subject.
One of the biggest changes in the v2 interface is the transformation of Rules into Triggers.
Like Rules, Triggers dictate when tags are ‘fired’ from our container. Similarly to Rules, Triggers can have one or many conditions on which to fire, but unlike Rules, all Triggers require you to start by choosing an event.
Link and Form Triggers also have an additional Enable When configuration that dictates when the Trigger is active.
Luckily, the new version also comes with an eye-pleasing ‘wizard’ interface that will help guide you through the process. To illustrate these changes, let’s step through creating a new Trigger in the interface.
Step One: Choose Event
In the v1 interface, Rules had to have firing conditions. One condition frequently used was {{event}} equals foo, where foo was gtm.click, gtm.formSubmit, etc. If a Rule didn’t have an {{event}} condition specified, it would try and fire as soon as the page loaded.
In v2, this is no longer the case; every Trigger requires an event condition. They make this obvious by forcing the selection of an event as the very first step in the Trigger creation process.

Here’s a quick overview of how each Trigger event type works:
- Page View: Has three flavors: The default fires as soon as GTM is loaded, but it can be set to fire when the DOM is ready or the window load event has fired; use this Trigger event for anything you’d like to fire as soon as possible
- Click: Has two flavors: Link Click and Click. Use this when you’d like a Trigger to fire when a user clicks on a link or other on-page element, except for form submissions.
- Form: Fires the Trigger when a user submits a Form. Use this when you want you Trigger to fire when a user submits a contact us or lead generation form.
- History Change: Fires the Trigger when the URL changes and the page is not reloaded. You might use this Trigger when you want to fire a pageview when the view changes in an Angular application or a modal opens.
- Custom Event: Fires the Trigger when an event you indicate is pushed to the Data Layer. Use this Trigger when you want to fire a tag with an event you create and push into the Data Layer object, like this:
{'event':'youTubeTrack'}. Accepts RegEx matches. - JavaScript Error: Fires the Trigger when a script executing on the browser throws an uncaught error. Use this Trigger when you want to fire Google Analytics Events when a JavaScript error occurs.
- Timer: Fires the Trigger on a set interval of time, like every three seconds, up to an optional limit. Use this trigger to fire a Google Analytics interaction event to exclude users who spend more than sixty seconds on the page from your bounce rate.
Many of these event types should feel familiar. In v1, we used Listeners in order to capture most of these events; v2 bakes them into the Trigger workflow. If you migrate a v1 Account, you will still see Listeners in your container but you eventually should switch to using the new Trigger method instead.
Step Two: Configure Trigger
Once you have selected a Trigger event, you will need to configure certain conditions and properties of the event. This is where you can specify specific variations of the Trigger event type you’ve selected. For example, you can change the Pageview Trigger event to fire when the DOM is ready, or the specify that the Click event you want occurs on Just Links (a-type elements) or All Elements.
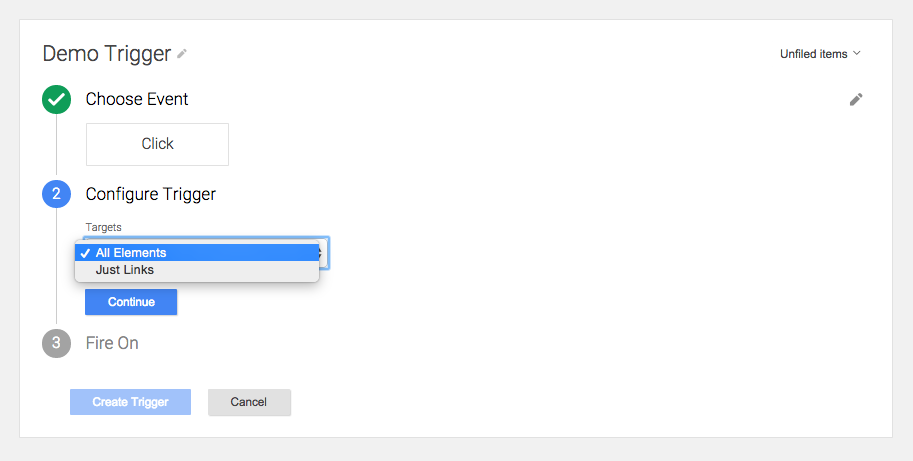
This is also where you specify if you want your Trigger to do special things, like only fire when all of the form fields on the page pass validation, or delay loading the next page a specified length of time so that your tags have time to fire. If you select either the Click -> Just Links or Form Trigger event, an additional step will appear.
Step Three: Enable When
Note: This additional configuration option will only appear for Link or Form Triggers.
If you selected the Form or Link Click Trigger event type and checked either Wait for Tags or Enable Validation, you’ll need to add an Enable When condition.
This is different then your firing condition. The Enable When condition allows you to specify when you do or do not want the Trigger to be available. This is useful because configurations like Wait For Tags occasionally cause conflicts with other on-page code. The Enable When condition forces you be surgical with your Triggers; when possible test your Triggers using the Preview tool in multiple browsers.

For instance, if you’d like to track PDF downloads and want to look for PDFs on any page on your site, set Enable When to {{Page URL}} matches RegEx .*.

Step Four: Fire On
When you’ve finished configuring your tag, it’s time to add your Fire On conditions. These are very similar to the Firing Rules of v1, except now the {{event}} condition is already taken care of for us.
Just like in v1, every condition you add to your Trigger must be met in order for your Trigger to fire. A Trigger with Fire On conditions {{Page URL}} equals /receipt and {{Page URL}} equals /thank-you will never fire; you must either use RegEx to match multiple conditions or create additional Triggers for each condition you’d like your Trigger to fire on.

Recap
And that’s all there is to it! While it may be an adjustment to go from Version 1 to Version 2, it certainly clarifies a few points and makes the steps to creating new Triggers very clear.
Remember that every time you want to create a Trigger, even a Blocking Trigger, it has to be associated with an event. You can use the Custom Event type with the expression .* in order to make the Trigger available on any event.
Use the Check Validation and Wait For Tags configurations with caution, and remember that Link and Form event Triggers require an enabling rule.
Finally, remember that all of your Fire On conditions must be met in order for the Trigger to fire. You can inspect which conditions were or were not met using the Debug Panel.
Advanced Troubleshooting Tips
Migrating to this new workflow is tough; some terminology will feel unfamiliar, and the Trigger creation wizard can be confusing. Here are some tips and common gotchas that we’ve seen:
Inspect the Tag inside the Debug Panel
If you can’t figure out why your tag isn’t firing, check the GTM Debug Panel in Preview Mode. On the left side of the panel, click on the Event that you expect your tag to fire on, then scroll to the bottom of the tag. Here, you’ll see the Triggers that fire that tag, as well as which Trigger Fire On conditions were or were not met during that Event.

No gtm.formSubmit, gtm.click, Or gtm.linkClick Event Appearing
Check that you have an appropriate Trigger created and that it is set to fire on that particular page. This goes back to the Enable When condition that tells Google Tag Manager where to listen for Forms and Clicks.
If you still do not see the events showing up in the Data Layer, verify that the Data Layer is not being overwritten further down the page in the on-page code.
gtm.click Appears Instead Of gtm.linkClick
Check that you selected the All Links option inside the configuration settings for your Click Trigger.
If you’re still having issues, check that there is no code on the page calling return false;, event.preventDefault(), or event.stopPropagation() in a click handler on the element. A good way to track this down is to use the Developer Console Search functionality and search for any IDs or classnames on your targeted element. You can access this by clicking the command line icon inside Developer Tools.

You Want To Fire On All Events Of A Particular Type
Sometimes, Triggers will default to asking for a condition when you create them. Typically, you can delete that condition using the – (minus) symbol next to it, then select ‘All Foo’, where foo is the event type.
What challenges have you faced with the v2 interface?
News & Insights
Related Perspectives


