Basic Google Analytics Filters For Every Site

Editor's Notes: Google has announced that all Universal Analytics properties must migrate to Google Analytics 4 by July 2023. Companies using Universal Analytics 360 properties have until July 2024, but encouraged to start immediately due to complexity.
In Google Analytics, Filters are used by Views to segment the data into smaller groups. Filters can be used to include only specific subsets of traffic, exclude unwanted data, or search and replace certain pieces of information.
Creating New Filters
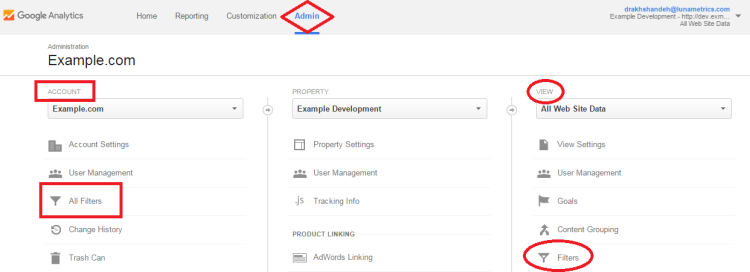
Filters can be created at either the Account or the View level. It is a best practice to create all the filters at the Account level, then assign them to different views. You can also create a filter at the View level, which would make that filter be applied to that particular view only; however, you should never need to do so unless if you have to create a filter based on Custom Dimensions or Metrics.
To manage or edit your filters, navigate to All Filters menu. Through the All Filters menu, you can manage or edit all the filters in the account. You can refer to Google Analytics documentation to learn more about creating and managing filters at different levels.

A Couple of Notes
A couple of notes before jumping into the basic filters tutorial:
Recommended Views
Unfiltered View – Always have a view called “Unfiltered View – Do Not Delete” defined to keep your raw data intact. This view is there to make sure if anything unexpected happens to the data at least you have a backup saved somewhere. You should never add any filters to this view.
Main View – This view would be the one you use for reporting on a regular basis. Call it whatever you like, but make sure it’s communicated to your team which view should be used for reporting.
Test View – Apply your filters to this “Test View” first. Since the effects of applying a filter cannot be undone, it is recommended that you apply your new filters to a Test View first and let them run for a couple of days, to have enough time to verify the credibility of the results. If you have not already created and defined a “Test View”, it is a good time to create one now; your Test View should use the same exact settings as your “Main View” that you would normally use for your reporting purposes. If everything looks good after a few days, then apply to your Main View.
Filter Processing
Filters cannot be applied to your previous historical data; they can only be applied to your data moving forward. Filters are processed in order, so make sure you arrange the filters in the correct order.
Naming Conventions for Views
If you have multiple websites, clients, companies, etc. you should use a naming convention for your views to make sure you can identify each view at a glance. This becomes handy especially when you are going through configuring your accounts, trying to figure out which views to apply a filter to.
Example: For the website Example.com, use “Example.com – Main View”, “Example.com – Test View” and “Example.com – Unfiltered View – Do Not Delete”.
Basic Filters
In this blog, I am going to cover some of the basic (as opposed to more customized) filters everyone can use to segment their data. We use these filters to make sure our data is valid, to clean up the data, and to find out where the data is coming from.
Data Collection
Exclude Internal IP
Include Internal IP
Include Specific Hostname
Include Specific Subdomain
Exclude Dev Site Traffic
Data Consistency
Make your data more correct and more consistent. Use the following filters to make your data more consistent. Also, if you are suffering from having (other) in your reports, give these filters a try to consolidate more data.
Prepend Hostname to Request URI
Lowercase Hostname
Lowercase Request URI
Lowercase Search Term
Lowercase Campaign Dimensions
Remove Query String
Append Slash to Request URI
Search and Replace Filter
Data Sources
Segment your data for better analysis. The following filters would help you avoid Sampling. Since all the default reports are aggregated at the view level, it would be wise to define and use more views. If you find yourself often applying Advanced Segments, using a view/filter might be a better option for you.
Include a Traffic Medium
Include a Device Category
Include a Country
Filter Configurations
Exclude Internal IP
Use this filter to exclude yourself, i.e. your company’s internal visits, from the Main View. You may also exclude the traffic from all third party companies or agencies you work with. Multiple IP addresses can be excluded using this filter, so gather a list of all internal IPs and follow the steps below.

- In Google Analytics interface, under Account, select All Filters.
- Click on +ADD FILTER.
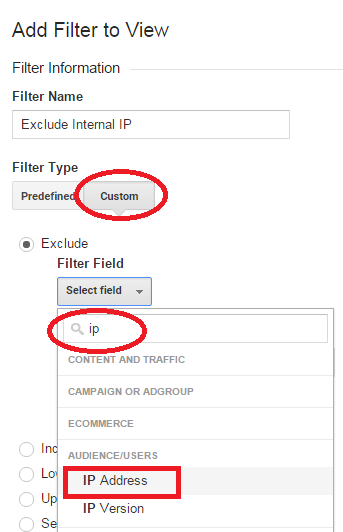
- In the Filter Name field, enter “Exclude Internal IP”.
- For the Filter Type, choose Custom.
- In the Filter Field drop down menu, in the search box, type “ip”, then select IP Address.
- In the Filter Pattern field, use regular expression to enter all IP addresses you would like to exclude.
- If you are excluding one or more distinct IP addresses, you should separate them by a pipe character, i.e. “|”. For example for the two addresses 192.168.1.1 and 255.255.255.1 you can enter 192\.168\.1\.1|255\.255\.255\.1
- If you are excluding a range of IP addresses, use a regex pattern that covers the entire range in one statement.

- Select which Views you would like to apply this filter too, then add them to the Selected views list. Hold the Ctrl or Cmd button down to select multiple Views and add them all at once.
- Click on Save to create the filter.

Take a look at Jon’s blog for more information on filtering internal traffic and different ways to identify employees!
Published: April 27, 2015
Include Internal IP
It is a good practice to define a View to only include the internal traffic. This view can be used as a way to understand how the internal teams use the website. The specific filter you need to apply to this view is similar to the one above, but this time choose the Include option as the Filter Type. Remember that you should only use one include filter for a dimension.
- Filter Name: Include Internal IP
- Filter Type: Custom > Include
- Filter Field: IP Address
- Filter Pattern: Use a regex pattern to include all your internal IP addresses
- Select the views to apply this filter to
Include Specific Hostname
This is one of the best filters you can make. Hostname is the domain of the page a visitor is on when they send a hit to GA. Obviously, you should only include traffic from people visiting your site. This is going to strip out a whole bunch of ghost referral spam, or traffic that never actually hits your website via the measurement protocol.
This filter is also especially useful when implementing cross-domain tracking. It would filter out data based on the hostname of the hits and record the data in their corresponding views.
Example: Assume you are tracking two domains www.exampleUSA.com and www.exampleGlobal.com. Assume you have defined separate views for each site called “exampleUSA Only” and “exampleGlobal Only” to segregate the hits. You would now need to create the following filters:
- Filter Name: Include exampleUSA.com Only
- Filter Type: Custom > Include
- Filter Field: Hostname
- Filter Pattern: ^(www\.)?exampleUSA\.com$
- Apply the filter to exampleUSA Only View
Also, create a similar filter for www.exampleGlobal.com.
- Filter Name: Include exampleGlobal.com Only
- Filter Type: Custom > Include
- Filter Field: Hostname
- Filter Pattern: ^(www\.)?exampleGlobal\.com$
- Apply the filter to exampleGlobal Only View

Include Specific Subdomain
Same as the above filter, just change the filter pattern to match the subdomain.
Example: Assume you would like to add a filter to the “Blogs Only” View, to only include the traffic from the blogs on exampleUSA.com.
- Filter Name: Include blogs.exampleUSA.com Only
- Filter Type: Custom > Include
- Filter Field: Hostname
- Filter Pattern: ^blogs\.exampleUSA\.com$
- Apply the filter to exampleGlobal Only View
Exclude Dev Site Traffic
To exclude development and staging traffic data from your production view, a.k.a. Main View, create the following filter:
- Filter Name: Exclude Dev Site Traffic
- Filter Type: Custom > Exclude
- Filter Field: Hostname
- Filter Pattern: Enter a regex pattern of all development hostnames for your website. For example, if the development hostnames are dev.example.com, backend.example.com, and stage.example.com you would enter ^dev\.example\.com$|^backend\.example\.com$|^stage\.example\.com$ in this field (or some similar Regex).

Prepend Hostname to Request URI
This filter is especially important if you are implementing a cross-domain tracking system. It would add the hostname to the beginning of the Request URI for every pageview hit, and then overwrite the Request URI with this new format. After applying this filter if you navigate to your Cross-Domain View, in All Pages report, you will have all pages with their corresponding hostnames.
Example: Assume you are tracking two domains exampleUSA.com and exampleGlobal.com. Assume the Request URI to the homepages of both sites are index.html. After applying this filter, in your Cross-Domain View, in All Pages report you will see the following Pages:
| Hostname | Homepage Address | Resulting Page |
|---|---|---|
| exampleUSA.com | /index.html | exampleUSA.com/index.html |
| exampleGlobal.com | /index.html | exampleGlobal.com/index.html |
Create this filter as follows:
- Filter Name: Prepend Hostname to Request URI
- Filter Type: Custom > Advanced
- Field A -> Extract A:
- Select Hostname
- Enter (.*)
- Field B -> Extract B:
- Select Request URI
- Enter (.*)
- Output To -> Constructor:
- Select Request URI
- Enter $A1$B1
- Select Field A Required
- Select Override Output Field
- Apply this filter to the Cross-Domain View

Lowercase Hostname
Your visitors might reach your website using different letter casings for the hostnames; e.g. Example.com and example.com. Create this filter to make the hostnames consistent.
- Filter Name: Lowercase Hostname
- Filter Type: Custom > Lowercase
- Filter Field: Hostname
Lowercase Request URI
This filter greatly consolidates the Pages by making all URIs to be lowercase.
- Filter Name: Lowercase Request URI
- Filter Type: Custom > Lowercase
- Filter Field: Request URI
Lowercase Search Term
The site visitors sometimes use different letter casings for their search terms. Create this filter to enforce all these terms to be recorded as lowercase.
- Filter Name: Lowercase Search Term
- Filter Type: Custom > Lowercase
- Filter Field: Search Term
Lowercase Campaign Dimensions
Generally in a business, there are going to be various marketing campaigns initiated by different departments across an organization. In most cases, marketing teams use tools such as URL builder to generate a campaign URL. However, two campaign names that were meant to be the same can be named with different letter casings and that would make Google Analytics record the data for each campaign separately. To make your campaign names consistent, create the following filter:
- Filter Name: Lowercase Campaign Name
- Filter Type: Custom > Lowercase
- Filter Field: Campaign Name

Just like lowercasing campaign names, it’s a good idea to make all campaign dimensions lowercase and consistent. Check with your marketing department before doing so! The following dimensions can be lowercase:
- Campaign Source
- Campaign Medium
- Campaign Term
- Campaign Content
Remove Query String
Sometimes, you may want a view that removes all query strings from your page URLs. You can accomplish this with an advanced filter.
- Filter Name: Remove Query String
- Filter Type: Custom > Advanced
- Field A -> Extract A:
- Select Request URI
- Enter ^([^?]+)
- Output To -> Constructor:
- Select Request URI
- Enter $A1
- Select Field A Required
- Select Override Output Field

Further Read: There are also other techniques for removing individual or all query strings from URLs. More detailed and advanced instruction can be found below:
Published: April 17, 2015
Append Slash to Request URI
When visitors can access a page with or without using a trailing slash, Google Analytics would record a separate pageview for each case. If you see separate rows in your All Pages report for the same page paths with or without the trailing slash, you may want to create this filter.
Note that this filter should be the last filter in the view as to not interfere with the other configurations.
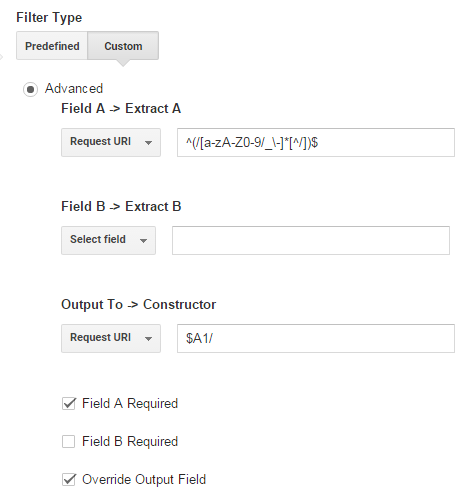
- Filter Name: Append Slash to Request URI
- Filter Type: Custom > Advanced
- Field A -> Extract A:
- Select Request URI
- Enter ^(/[a-zA-Z0-9/_\-]*[^/])$
- Output To -> Constructor:
- Select Request URI
- Enter $A1/
- Select Field A Required
- Select Override Output Field

Search and Replace Filter
Use this filter to look for information and modify it before it gets recorded in the aggregated tables.
Example: Let’s consider if the site pages can be accessed with or without www. As a result, Google Analytics would create two rows to include both cases for each page. To avoid this, and to consolidate pageviews, create the following search and replace filter. This filter would look for “exampleUSA.com” as the hostname and replace that with “www.exampleUSA.com”.
- Filter Name: Search and Replace www Filter
- Filter Type: Custom > Search and Replace
- Filter Field: Hostname
- Search String: ^exampleUSA\.com$
- Replace String: www.exampleUSA.com
- Apply the filter to exampleUSA Only View

If you’re using the prepend hostname filter from above, make sure this filter comes first!
Include a Traffic Medium
Let’s start with Organic Traffic. To segregate organic traffic from the other means of reaching your website, define this filter and apply it to the Organic Only View.
- Filter Name: Include Organic Only
- Filter Type: Custom > Include
- Filter Field: Campaign Medium
- Filter Pattern: organic
- Apply the filter to the Organic Only View
You can define similar filters to only include the paid search traffic (filter pattern: cpc), email (filter pattern: email), etc.
Include a Device Category
First, create a filter for mobile devices. Add this following filter to the view that only contains traffic from mobile devices, i.e. Mobile Only View.
- Filter Name: Include Mobile Only
- Filter Type: Custom > Include
- Filter Field: Device Category
- Filter Pattern: Mobile
- Apply the filter to the Mobile Only View
You can create similar filters for Desktop Only and Tablet Only views.
Include a Country
To include traffic only from a particular country or region create a similar filter to this one.
- Filter Name: Include US Traffic Only
- Filter Type: Custom > Include
- Filter Field: Country
- Filter Pattern: United States
- Apply the filter to the US Traffic Only View
If there are multiple countries you are interested in including in a view, enter a pipe “|” separated list of them; e.g. United States|Canada|Mexico

Summary
Well, there you have it! A grand list of simple filters that can add tremendous value to your analytics account.
Are there other filters that should be included in this list?


