Google Analytics Enhanced Ecommerce: The Order Of Implementation

Enhanced Ecommerce for Google Analytics (Universal) can offer a goldmine of valuable information about your users’ purchases and shopping behavior. With some of its more advanced features, Enhanced Ecommerce can even provide insight into the performance of your product lists and internal promotions.
In short, it’s great and everybody should be using it! There’s no reason you can’t start setting it up today! All you need to do is send the link to Google’s documentation to your developer, and by tomorrow morning, you can start using those Enhanced Ecommerce reports for actionable insight.
Before You Start
If you have a crack team of expert developers at your disposal, you could realistically have Enhanced Ecommerce data this week, but this isn’t always the case. If you are a developer, you might be rolling your eyes right now because you’ve already received an enthusiastic email from your marketing team with a link to Google’s Enhanced Ecommerce documentation, along with 15 other requests for updating the homepage carousel images.
Luckily, enabling Enhanced Ecommerce can actually be done in stages, with time for testing along the way. We typically recommend an order that starts with measuring the most important actions, then moving on to the more complicated features.
First, consider the types of actions that you want to measure with Enhanced Ecommerce. This is important because it lays the foundation for the implementation to follow. For instance, if you have a robust eCommerce site, you might want to track more points of engagement than if you have a simple donation process. Make sure to read Sam’s post on Enhanced Ecommerce FAQs for the basics.
Second, choose your flavor of Enhanced Ecommerce. There are two main ways to add Google Analytics to your website: you’ll either add it using JavaScript, known as Analytics.js, or through the built-in Tags via Google Tag Manager. Make sure you understand how Google Analytics is currently loaded on your site, and that will dictate which support documentation to use. We’ve included links to both below!
Third, enable Enhanced Ecommerce for each View that will be using this information. This option is at the View Level.
Fourth, begin updating your website. Here is a suggested order for implementing the features of Enhanced Ecommerce. As a best practice, we always recommend that you use a test property to start and make sure that everything is tracking correctly before enabling it for your main property!
Step One: Purchases
Analytics.js Development Guide | GTM Development Guide
This is the most important action and should almost always be your first step. If you’re upgrading to Enhanced Ecommerce from the older ecommerce tracking, this provides similar data. Whether you’re using on-page tracking code or Google Tag Manager, measuring this action requires the ability to programmatically populate values from your shopping system on your final checkout confirmation page, or whatever page the user sees immediately after he or she makes a purchase.
This code specifies that a purchase was made and includes information about the purchase, such as transaction ID (required), revenue, tax, shipping, or if a coupon code was applied. This is also where you include information about the products that were included in that transaction.

Optional Step: Refunds
Analytics.js Development Guide | GTM Development Guide
If your refund process takes place on your website, you can track them similarly to purchases. For example, if a user submits a refund request and gets to a confirmation page, you can specify the refund information to Google Analytics (you must use transaction ID and for partial refunds, product IDs, and quantity). This can help make your Enhanced Ecommerce purchase data more accurate.
Step Two: Checkout Steps
Analytics.js Development Guide | GTM Development Guide
Now that you have information about purchases, we recommend setting up tracking for the steps in your checkout process. This is usually one of the easier things to set up, and the reports that Google provides with this data can be really valuable for helping you find issues/opportunities with your checkout funnel.
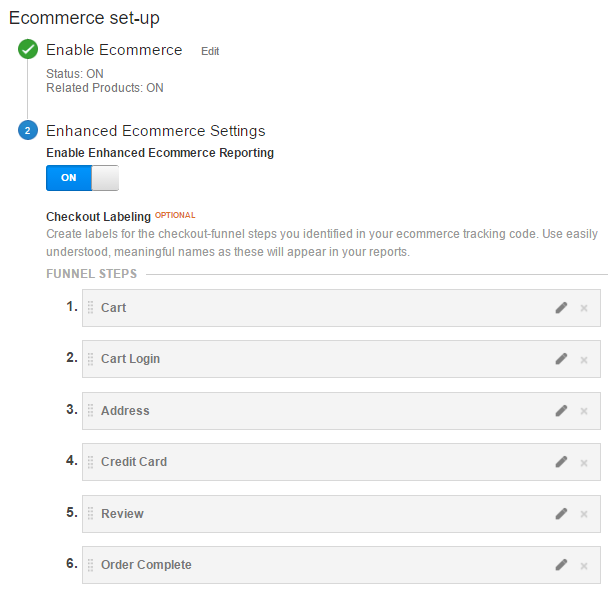
Setting up your Checkout Behavior Analysis funnel is a two-step process. You’ll name the checkout steps inside of the Google Analytics interface, then you’ll place the appropriate code on the individual pages within your funnel. This will enable your Checkout Funnel report inside of the ecommerce Reports. In some cases, you might want to delay setting up tracking for all of the other shopping actions throughout your site if you discover users are ultimately dropping off in your checkout funnel.

Optional Step: Checkout Options
Analytics.js Development Guide | GTM Development Guide
If you allow users to select options during the checkout process and you want to capture those values, you can also add Enhanced Ecommerce code to link user-selected options to each checkout step. This can be something like a type of shipping, a particular credit card, or some other mutually exclusive group. Most likely, it will be easiest to add this code at the same time as checkout steps.

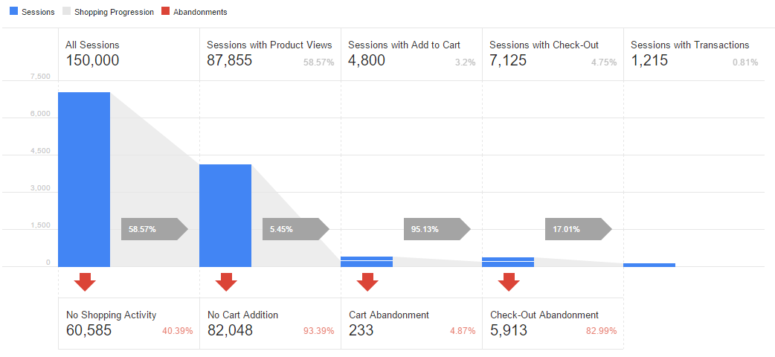
In addition to the checkout funnel report, Enhanced Ecommerce can also show you the overall shopping behavior funnel, which includes actions such as adding a product to a cart or viewing a product detail page. You can still add the code to your site in phases, but there are additional metrics (Cart-to-Detail Rate, Buy-to-Detail Rate) and reports that are more beneficial once they are all in place. If possible, implement them together!
Step Three: Product Detail Views
Analytics.js Development Guide | GTM Development Guide
The code for this step isn’t difficult, but unlike purchases/refunds or checkout steps that only include a few pages, this code needs to be placed across all product pages throughout the site. For large commerce sites, this may be a little more time-consuming if there are multiple templates for product pages, but this is valuable in understanding the user path from viewing product information to making a transaction.
Here, you’ll pass in the specific product that a person is viewing and all of the information about that product: color, brand, variation, category, etc. Enabling this step will help add to your Shopping Behavior Analysis funnel.
Step Four: Add to Cart & Remove from Cart Actions
Analytics.js Development Guide | GTM Development Guide

Adding and removing products from a shopping cart indicates users’ interest in or intent to purchase. Tracking these actions can help you better understand how they contributed to purchases made in the same session, plus provide more insight at the product level. Like checkout steps, this is typically one of the easier phases in a complete Enhanced Ecommerce implementation, but the data provided can also lead to deeper analysis and segmentation. For an example, check out Jonathan’s post on buy-to-cart rates.

Steps Five & Six: Product /Internal Promotion Impressions & Clicks
Analytics.js Development Guide | GTM Development Guide
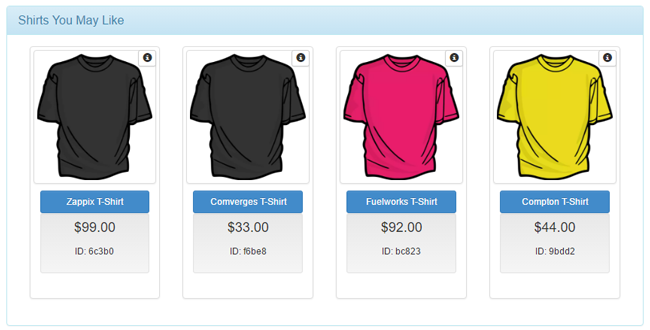
Finally, product and promotion impressions and clicks can also be measured. However, this can be one of the most challenging parts of Enhanced Ecommerce because it requires identifying lists, product positions and info about creatives throughout the site. Because commerce sites often have multiple formats and templates for product lists and internal promotions, choosing how to label these in a way that is useful for analysis can require significant time and effort. These lists and promotions may also change frequently, so this may involve more regular maintenance than some of the other actions.

Moving Forward
These steps are just a recommendation for getting started with Enhanced Ecommerce, but of course there will be unique considerations (there are ALWAYS considerations) depending on your site’s code, your shopping cart system, your resources and your overall company objectives.
There are many ways to continually improve your implementation. Adding custom dimensions can widen the amount of data about each product that is collected, using Data Import can help standardize and fill in gaps with your commerce information. Continually auditing your site against your internal data will help identify issues like duplicate transactions and data integrity issues.


