Free Data Studio Template For Your Google Analytics Data

If you haven’t tried Data Studio with your Google Analytics data yet, get ready to be blown away! We love Data Studio, the new tool from Google that allows you to visualize data from different sources and easily share interactive reports with your colleagues.
With unlimited, free reports for everyone, it’s easy to start playing around with the tool and see if it meets your organization’s needs. To help with that, we’ve created a free Data Studio report that you can use as a starting point for your organization. Use our interactive Monthly Overview report to create an interactive report that you can share with colleagues, even if they don’t have access to your Google Analytics. Take our report, make a copy, and replace with your own data!
We built our report using GA data from the new Google Analytics Demo Account – which is free and available to all. If you don’t have a GA account that you can use, I’d recommend reading the Demo Account blog first and signing up for the free Demo Account, then following the steps below to practice creating reports with real data.
Our Data Studio report comes with an easy step-by-step guide to get you started!
Step 1. Make a Copy
Go to the File menu and click to make a copy of the report. If you have never used Data Studio before, click to accept the terms and conditions, and then redo this step.
Step 2. Do Not Request Access
Click “Maybe Later” when Data Studio warns you that data sources are not attached. If you click “Resolve” by mistake, do not click to request access – instead click “Done”.
Step 3. Switch Edit Toggle On
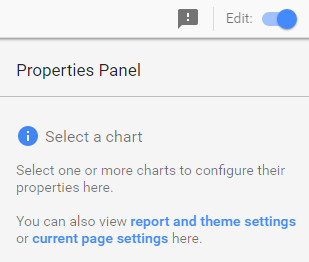
Make sure the “Edit” toggle is switched on (see screen shot). Click the text link to view the current page settings. The GA Demo Account data will appear as an “Unknown” data source there.
Step 4. Select Data Source
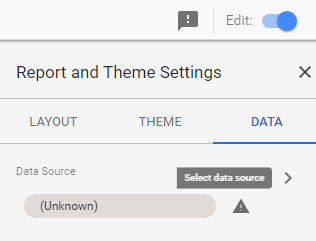
To view the list of available data sources, click the tiny arrow that looks like an angle bracket in the screen shot below. This will open a pane from the right side of the page.
Step 5. Create New Data Source
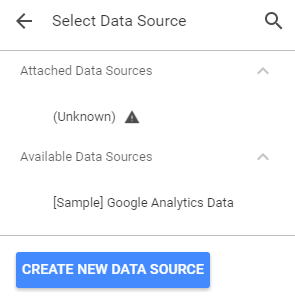
If you have not created any data sources yet, you’ll see only sample data under “Available Data Sources” – in that case, scroll down and click “Create New Data Source” to add your own GA data to the available list.
Step 6. Select Your Google Analytics View
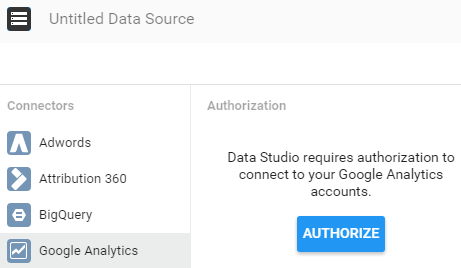
Choose the Google Analytics connector, and authorize access if you aren’t signed in to GA already. Then select your desired GA account, property, and view from each column.
Step 7. Connect to Your GA Data
Name your data source (at the top left), or let it default to the name of the GA view. Click the blue “Connect” button at the top right.
Step 8. Add Data Source to the Report
Next, Data Studio shows you a table of all the fields available in your data. You can rename them, change their type, and create new calculated fields – but for now, simply click “Add to Report”. And confirm.
Because you’re doing this step under Report Settings, you’ve just created the default data source for the entire report. You can change a data source on any page (or on any chart or filter!) – but if you don’t specify a change, then the default data source is used for every new element you add to the report.

Step 9. Check Your Conversion Data
If necessary, tweak the definitions of conversions and conversion rate to correspond to a different goal number and name. In this report “conversion” refers to the Goal 1 completions and Goal 1 conversion rate in GA, but your primary conversion may be numbered as Goal 2 (or some other number) in the Google Analytics view you selected.
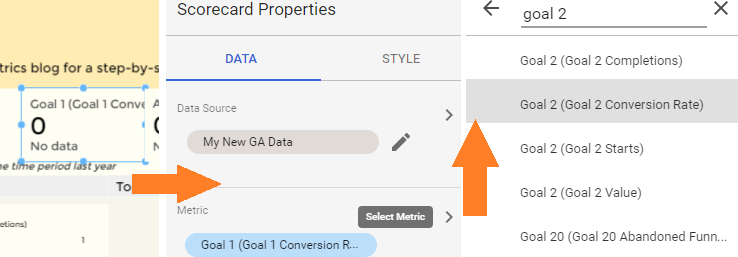
If it’s Goal #2 you need instead, then change Goal 1 to Goal 2 everywhere you see the word conversion in the demo report. Click on the element you want to revise, e.g. the Scorecard metric in the center of the top row (see screen shot). This will pull up the Scorecard Properties where you can make the change – click that tiny little arrow to “Select Metric”. Type “goal 2” in the search box, and then click to select “Goal 2 Conversion Rate”.
If you don’t have any goals set up yet in Google Analytics, get out there and make some! Pick at least one important page and count it as a conversion by configuring a goal in the Admin panel in Google Analytics. Here’s an Analytics Academy course on goals to help you.
Good conversion data (or ecommerce data, but that’s another report) is the best way to evaluate traffic channels and audience segments, because you can see which channels and segments lead to site users doing what you want them to do.
Step 10. Customize for Your Organization
Here comes the fun part! Swap out the image in the top left with your own company’s logo. Delete the text that talks about our blog post. Update the colors to match your own internal branding, swap out graphs or change items. Add new pages or target specific reports to departments within your organization!
Step 11. Report Filter Combos!
Our demo report contains seven different filters which you can use alone, or mix and match. Select one or more options from each filter, and watch them update every chart and metric on the page.
Create your own filter combos! Here’s a few for inspiration:
- Paid search mobile traffic
Channel = Paid Search
Device = mobile - Users who visited at least twice in the same day
User Type = Returning
Days Since Last Session = 0 - Non-bounced users from outside your country
Session Duration is not 0 (un-check that option)
Country is not your country name (un-check that option)
Which filter combos show a higher conversion rate? What cities appear as conversion locations when you tweak the filters to look at traffic from a specific marketing effort? Which sources and pages rise to the top with each change?
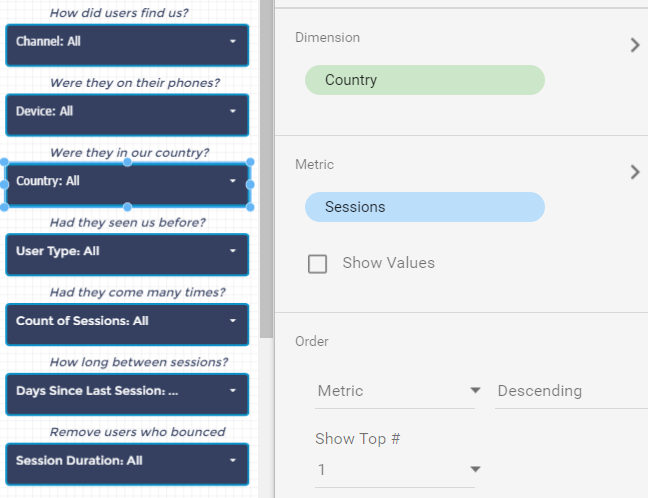
You may want to adjust the filter definitions, e.g. the Country filter. It shows only two options: the country with the most sessions (usually your country), and “all others” – but you can change the settings to show a much longer list. Scroll down to the options for “Top 1” and change it to “Top 5” or as many as you want (see screen shot).
Bonus Tip: To preserve a comparison across two slightly different filter combos, such as U.S. traffic vs. non-U.S. traffic, duplicate the page (under Page menu, choose Duplicate) – then turn off Edit mode and select a different filter option on each page.
Extra bonus tip: Duplicate any page and choose individual report elements to replace the data source to compare data from GA views for different site sections or microsites! You can hold down CTRL or SHIFT and click multiple items on the page to speed this process up!
Step 12. Optional: Editing the Data Source
Totally optional, but – go back and edit the data source to shorten the names of a few dimensions and metrics – it will make your report easier to read. We used text boxes to identify the scorecard metrics in our report, but if you want to show the Metrics’ names, you’ll end up with some longer names that are harder to display.
In addition to renaming dimensions and metrics, you can even create your own dimensions and metrics using a variety of formulas!
Go to the report and theme settings (under the File menu), and click the pencil next to the data source (on the Data tab). Double click to edit the field name – that’s it! To create your own fields, click the blue plus icon. See helpful tips by clicking the question mark icon next to the formula field.

Important Data Source Editing Note:
Use Owner’s Credentials only if you plan to share the report and don’t mind sharing your GA data attached to the report – otherwise, use Viewer’s Credentials so report users must log in with their own password to access the data source, or replace it with their own data.
Since our Monthly Overview report was created using the publicly available Google Demo account, its data source is attached using Owner’s Credentials.
What Else Can You Do with Data Studio?
See my colleague Jon Meck’s post for a great summary of the features of Data Studio – we’ve only scratched the surface here with tips on replacing data sources and making basic adjustments to the data behind charts and filters.
Coming Next: Check out our Ecommerce-themed Data Studio template, and stay tuned as we post more tips and templates!
Published: October 25, 2016


