Google Ads Editor: The Best Time‑Saver For A PPC Marketer
If you know me, you know that I don't like to waste time. I'm from Brooklyn, so I talk fast and I walk fast. I like efficiency and speed. This is very true in all facets of my life, including my work as a PPC marketer.
That's why I love the Google Ads Editor Tool. If you're a PPC marketer building and managing campaigns, it is, hands down, the best tool to save you time and make your processes faster and more efficient.
Let me tell you more.
The Editor Tool – What Is It?
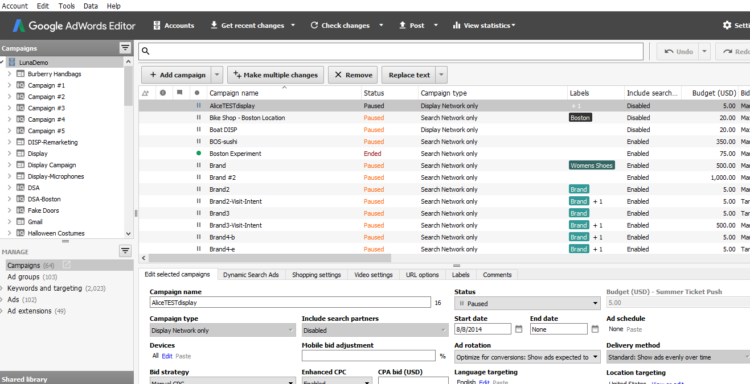
The Google Ads Editor tool is the offline version of Google Ads. There, you can access account data and make quick, bulk edits. It's all at your fingertips. Quickly click from one place to the next to get from keyword to location targeting to site link to placement targeting and so on.
Below is a picture of the offline Google Ads Editor Tool. The snapshots that you'll see in this post are from a fake account. No real, client data is being shown!

Walk-Through of the Interface
Here's a quick overview of the tool in case you're unfamiliar. If you've used it before, scroll down to the next section!
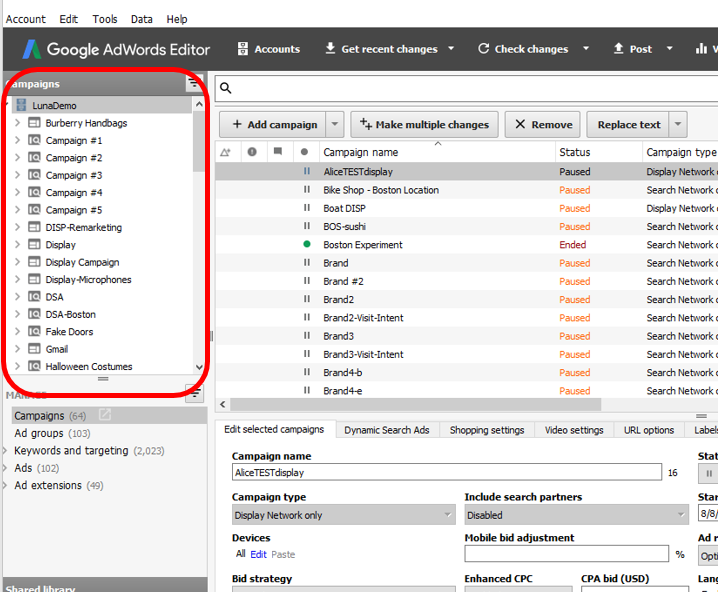
Upper Left Side
This is where you'll find all of your campaigns.
- Gives a quick view of your account structure
- Click the campaigns to see your ad groups
- Click an ad group to see the keywords

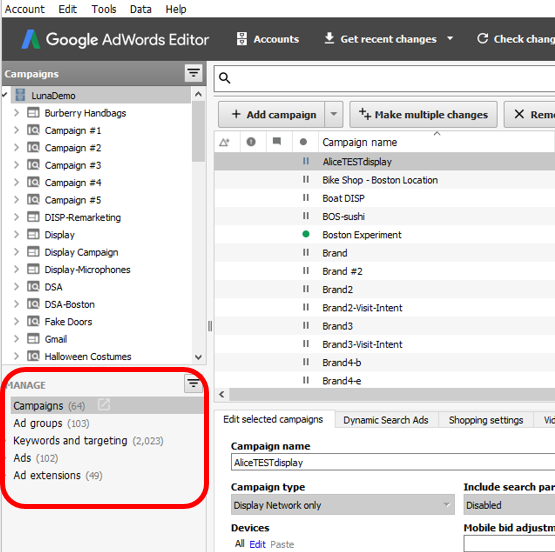
Lower Left Side
This is where you navigate to campaign elements and targeting criteria to make changes.
- Focus on the "Manage" section. This is where you can manage those campaign elements or targeting criteria
- It’s very easy to click from one place to the next. Need to access ad copy? Click on 'Text Ads' (or 'Expanded Text Ads' now). What about your keywords? Find the 'Keywords' selection. How about making an update to the call extensions? Click the 'Call Extensions' selection.
- The number in parentheses gives you a total count. If you see Keywords (1005), that means you have 1005 keywords

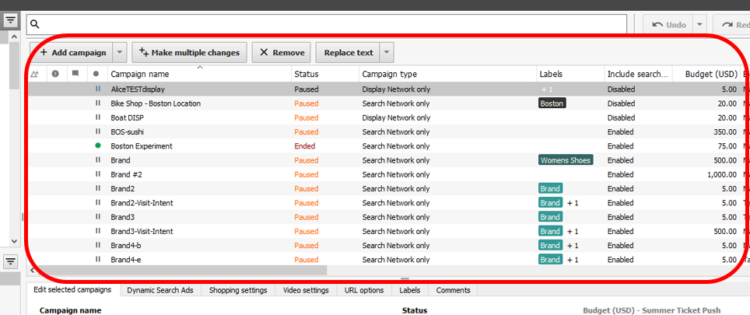
Main Dashboard
Provides an in-depth view of your campaign elements or targeting criteria.
- You can modify the columns to see important information (i.e. bids, final URL, labels, etc.)
- Editor automatically updates as you click on different selections
- Found directly above the main dashboard are buttons that allow you to create, remove or make bulk changes

Below Main Dashboard
This is where you make adjustments.
- Adjust settings, targeting criteria, ad copy, keywords, bids, naming conventions, etc.

Top Navigation
The top navigation contains extremely important buttons that allow you to post new updates and get the most recent version of the account (remember, this is an OFFLINE tool, you need to sync to get online updates.).
- The 'Get Recent Changes' button will allow you to see the current state of the account. Do this BEFORE you post anything live. You do not want to override someone else's change(s)
- The 'Post' button will allow you to post the changes you just made within the tool

Time-Saving Features
I already mentioned that I love the editor tool because it saves time. This is why:
It's FAST!
You don't have to wait for a webpage to load. You can click from one section to the next without worrying about load time.
Tip: This can be especially time-saving for those of you with large accounts. I have some accounts with tens of thousands of keywords and if I want to access those keywords, the editor tool takes much less time to load than the online version
Shortcuts Save Even More Time
You can use copy (CTRL + C or CMD + C) and paste (CTRL + V or CMD + V) to easily copy and paste almost anything. Campaigns, ad groups, keywords, location targeting, audience targeting, negative keywords, ad copy, sitelinks, etc.
Tip: This is helpful for everyone! Imagine that you never have to go through the process of creating a campaign from scratch again. You press CTRL + C, then CTRL + V, and… you just created a new campaign in a few seconds! Granted, you'll need to make adjustments, but you can easily copy, paste and then update. I do this ALL the time.
Additional Tip: Don't limit this to campaigns. Copy and paste ad groups, keywords, and ad copy too! Location targeting becomes especially easy. In the offline tool, you are not able to copy and paste locations. In the online tool, you can. I bet I just saved some of you at least an hour of work with that last tip.
Bulk Editing
You can select multiple items across campaigns and ad groups to make quick bulk edits. You can easily highlight multiple items account-wide. By doing this, you can make quick, bulk changes across your entire account.
Tip: I use this a lot for ad copy. Let's say I need to make a bulk change to ad copy found across multiple campaigns. I select all the copies using the control or shift button on my keyword and from there, make that ONE change across a TON of ad copies. This saves more time than updating each individually.
Powerful Searching Capability
CTRL + H can be used for several shortcuts. With the CTRL + H shortcut, you can make the following changes:
- Find and replace keywords, ad copy, naming conventions, etc.
- Append or prepend functionality
- Bid change functionality that lets you adjust bids by a certain percentage, raise to top-of-page bid or first-page bid. This is a little-known secret.
Tip: I use the append or prepend functionality when turning non-brand keywords into brand keywords. For example, if you want to add brand variations, you can take your non-brand keywords and use control + h, then append your company's brand name. Now you have a branded keyword. I do this across multiple keywords at the same time.
Make Multiple Changes At Once
The "Make Multiple Changes" button sounds exactly like it is. You can speed up the process of adding any campaign elements by loading them all at once. Need to add 20 new keywords? How about new ad copy? Even several new campaigns and ad groups can be loaded into the offline editor tool at once.
Speedy Changes To Match Types
Expanding keyword match types becomes simple. When adding new keywords, it is likely that you'll want more than one match type. Using the copy and paste functionality, it's easy to get all those different match types in your ad group within seconds.
Here's a scenario: You have 10 keywords in your account all in exact match. You also want them in phrase match. All you have to do is copy the current exact-match keywords (CTRL + C), paste them (CTRL + V), and then update the match type button from 'Exact' to 'Phrase' which literally takes 5 seconds.
Tip: There's a quick way to copy and paste broad match keywords. Let's say we're looking at the same situation as above, but now I want to copy my exact keywords into broad match modified. First I copy (CTRL + C) the exact match keywords, paste (CTRL + V), then update the match type to 'Broad'. To make sure I have broad match modified, I do the following:
- Use CTRL + H for find and replace. I find a space and replace it with a space plus the "+" special character. For example, if my keyword is homes for sale, my keyword now looks like this: homes +for +sale
- Use CTRL + H again and click on the 'append' tab. From there, add + to every keyword using the "before existing text" selection. This is basically what happens: From homes +for +sale, now my keyword looks like this: +homes +for +sale
How Do I Download?
Go to the Google Ads Editor Tool page.
Once you download, make sure to get the most recent changes as noted above. Google will periodically release new versions so always make sure you have the most up-to-date one.
The Google Ads Editor Tool is a great time-saver, but it's also complex and takes some time to master. There are a ton of free YouTube videos to help you get started and continue to learn. My co-worker, Nick, wrote a great blog post on common issues and how to solve them. It's a great resource as well!
So get started, try out the Google Ads Editor Offline Tool, and let me know how much time you save!


