Using Fields To Set In Google Tag Manager

The tag templates in Google Tag Manager are great, but sometimes you just need a little more customization. Maybe you want to have more control over your users’ cookies or you might need to send a virtual pageview. Or maybe you just want to set up cross-domain tracking. In all of these cases, a standard GTM tag just won’t cut it. Well there is a (slightly hidden) setting you may or may not know about that could change the way you configure your tags!
What are Fields to Set
The ‘fields’ in the phrase ‘Fields to Set’ refer to a list of optional inputs that expand upon GTM tag templates. Configuring fields gives you a lot of control over your tags, overriding the default values when necessary. They allow for more advanced, creative, personalized, and potentially more accurate tracking.
Where are Fields to Set
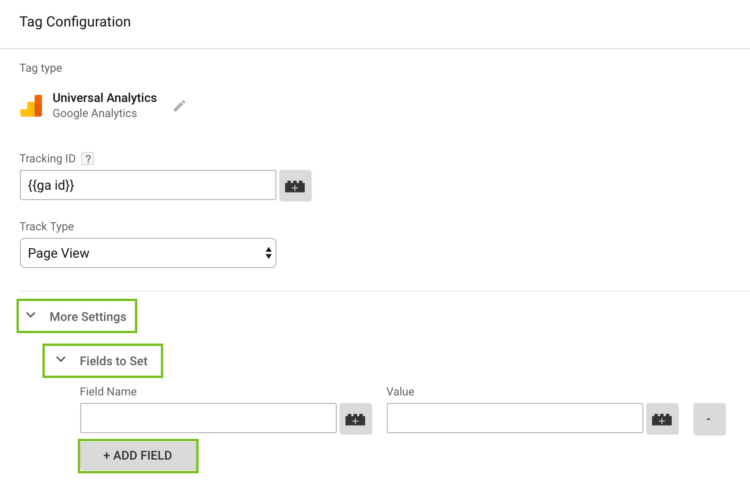
Fields to Set are located under the ‘More settings’ dropdown. You can set them for tags of any tracking type.

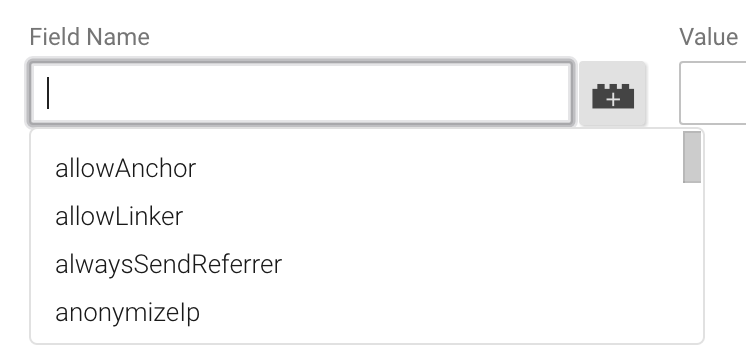
Clicking in the input to type a field name will cause a dropdown to appear. You can scroll through this list to find the field you’re looking for or, if you know the field you need, you can just start to type the field instead.

There are some fields that are not included in the dropdown, however Google’s field reference lists all possible fields.
Important Fields to Set
Here is a list of the some commonly used fields.
| Field | Description |
| allowLinker | Accepts ‘true’ or ‘false’ where true enables cross-domain tracking |
| campaignContent campaignMedium campaignName campaignSource |
Override your campaign tracking parameters |
| cookieDomain | ‘auto’ sets cookie at top-level domain, ‘none’ sets cookie without specifying domain |
| legacyHistoryImport | Accepts ‘true’ or ‘false’ where true allows analytics.js to import history data from ga.js cookies |
| page | Page path, begin with ‘/’ (Usually when setting up virtual pageviews) |
| sampleRate | Specifies percentage of your users that should be tracked |
| siteSpeedSampleRate | Specifies how often site speed tracking beacons are sent |
| title | Page title (Usually when setting up virtual pageviews) |
| userId | User identifier across devices and browsers |
A Few of Our Favorites
There a few fields to set that you’ll use more than others! I’ve pulled a few that we have covered in more depth in other blogs on our site.
cookieDomain
This is one of the most important fields to set if you have any subdomains on your website. This field determines the domain on which a user’s cookies will be set. Using the standard Google Analytics JavaScript snippet will automatically set this field for you, but if you implement through Google Tag Manager, you need to set this field yourself.
It’s important because if the cookies are set on a subdomain, the user will have a different set of cookies on the top-level domain and will not be tracked as a single user. In order to avoid this, simply set cookieDomain equal to “auto”. This will ensure that cookies for users will always be set at the top-level domain, avoiding any potential session-breaking.
allowLinker
The allowLinker field enables cross-domain tracking. Setting this value equal to ‘true’ allows for a passed client ID from a different domain to override the current user’s cookie. This is essential for tracking one user across more than one domain, but if you have more than one subdomain it is not necessary. Here’s a little guide Jim wrote to help you identify whether or not you need cross-domain tracking.
userId
The user id field allows us to follow users around as they move from device to device. This functionality allows you to actually observe a human being as opposed to the traditional definition of a user (where a user is a set of cookies on a browser, not necessarily a single person). Amanda wrote a post explaining how to set up user ID. In order to utilize user ID you generally need some sort of log-in on your site, however Jonathan explained how to utilize this functionality even if your site does not have a log-in here.
page and title (Virtual Pageviews)
Sometimes you might want to track a pageview when a pageview doesn’t technically occur. For example, if there is a pop-up on your page and you want to analyze it alongside the other pages on your site, you could send a virtual pageview to Google Analytics when the pop-up is shown.
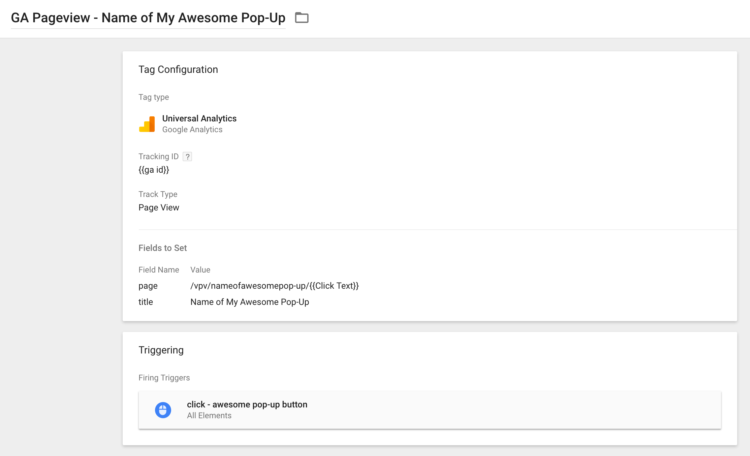
In order to set this up, create a Page View tag and set it up like you would normally. Then go to the Fields to Set setting. Here we are going to set two fields: page and title. Page refers to the path of the page – this is what will show up in the pages reports. Be sure to indicate that the page is a virtual pageview so as to not confuse anyone who is looking at your pages reports. You can input static text and variables, so you could name it something like /vpv/nameofawesomepop-up/{{Click Text}}.
The title field will give your virtual page a title. This should be short but descriptive. Something like “Name of My Awesome Pop-Up”. Make sure to change the trigger to fire when you want your virtual pageview to fire. To continue with my example, your trigger might be a click on a button that causes the pop-up.

And that is just scratching the surface – there are over 100 Fields to Set to choose from! What are your go to fields? Let us know below!


