Connect Google Analytics Data To Your Tools Via BigQuery

One of the huge advantages of Google Analytics 360 is the connect that pipes Google Analytics data directly into Google BigQuery. If you are a GA360 customer and you current create reports outside of the Google Analytics interface, in some other platform or tool, consider pulling data out of Google BigQuery rather than using the Google Analytics API. This will not only allow you to get your data unsampled, but you will also be able to aggregate and manipulate your data in more advanced ways.
Google Analytics data can be valuable to have in many other systems and can be used for visualization, investigation, or merging with other data sets. Many reporting tools, such as Data Studio and Tableau, have BigQuery connectors built in. Each tool is a little different, so you’ll have to look at those tools to determine exactly how their connectors work.
When you connect to BigQuery, however, you’ll have to make some decisions about what exactly to connect to and how much data you’ll need to import into your other tool. Google Analytics 360 customers can see their Google Analytics data in BigQuery in raw Google Analytics tables. For specific applications, like visualization, before you connect to Google Data Studio, Tableau, R, etc. – you would ideally transform this raw, hit level data into a more usable format.
There are several ways of doing this:
- Entering a custom query directly into the tool
- Creating a view in BigQuery
- Creating and updating a table in BigQuery
I’ll talk briefly about each of these options before describing how you can schedule updates to your transformed BigQuery tables through Google Apps Script. I will not talk about how to write the queries themselves, but if you are new to this process, you may want to check out our BigQuery recipes.
Custom Query
Any reporting tool with a BigQuery connection should allow you to enter a custom query directly into the tool.
For example, in Data Studio, “Custom Query” is one of the options when you select the BigQuery connector:
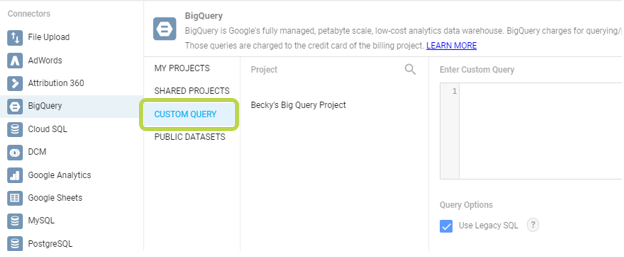
Tableau also has a “New Custom SQL” option which allows you to enter a query.
This is the easiest and most straightforward way to get your BigQuery data into your reports. You can create and test your query in the BigQuery interface and then copy it into your tool’s query editor.
However, if your query takes a long time to run, or if you have multiple queries that depend on each other, this solution may not be right for you.
BigQuery Views
Another way to customize your data before you report on it is to use a View in BigQuery. Saving a View is like saving the instructions for creating a table, rather than saving the table itself. Every time you connect to a View, BigQuery runs your instructions and then sends you the customized data as a table.
You can easily create Views in the BigQuery interface by typing in your query and then clicking Save View.
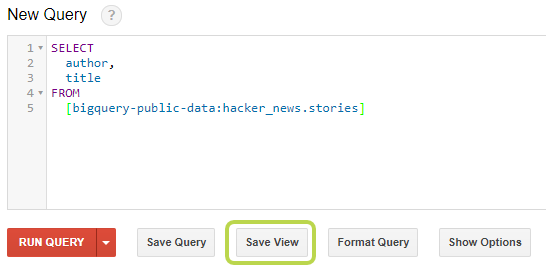
You should then select a Dataset and give your View a name.
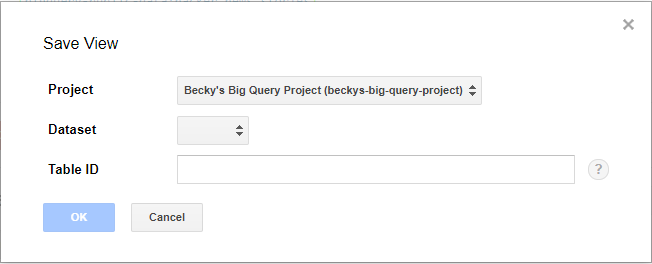
After clicking “OK”, your view will be listed in under the dataset drop down with a green icon beside it.

Now, you can select this View in your reporting tool to get clean, processed data.
The great part about using Views is that it keeps your queries in BigQuery interface, where they are easy to view, test, and update. You can also reuse the same View across multiple different reporting tools. In addition, if you build your query using dynamic date ranges, you can have fresh, updated data every time your tool connects to BigQuery.
The downside to Views is that the query is run every time your reporting tools access the View. While this gives you updated results, it may be frustrating to wait for queries that take a long time to run. In addition, you are charged for every query that you run in BigQuery. While these charges are usually very small, they may add up if you have a lot of data or are running many reports. If you want more control over how many times your queries are run or want to run the query before the report tries to load, the next solution might be best for you.
Scheduling Queries to Refresh Tables
The final option is to create a static table in BigQuery with your processed data. Then periodically refresh this table through a scheduled query. This process can be done for free with a Google Apps Script! The steps for setting this up are listed below.
- Write and test your query through the BigQuery interface.
- Open a blank Google Sheet.
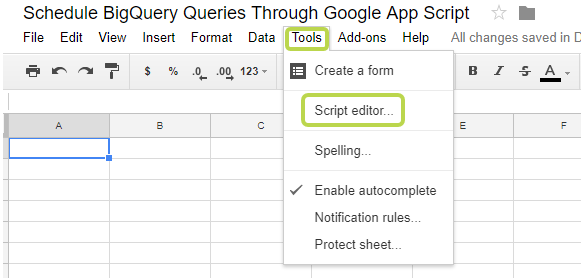
- Open the App Script editor by clicking on “Tools” -> “Script Editor”
- Enable the link between Google Apps Script and BigQuery.
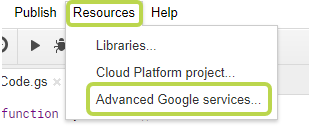
- Click on “Resources” -> “Advanced Google Services”
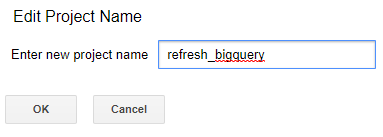
- Give your project a name and click “OK”
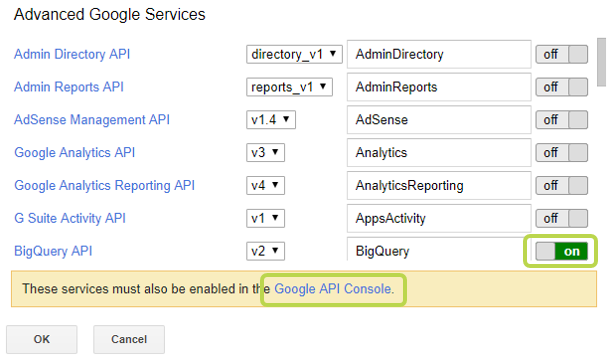
- Turn on the BigQuery API the click on the blue “Google API Console” link at the bottom.
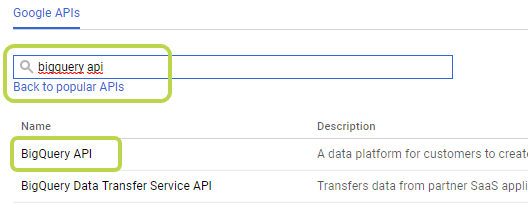
- Search for “BigQuery API” and click on the result.
- Click “Enable”.

- Go back to the script editor and click “OK”.
- Click on “Resources” -> “Advanced Google Services”
- Copy the following code into the editor and update the:
- projectId
- datasetId
- tableId
- query (if your query spans several lines, you may need to add a javascript line break)
- You may also want to change the write disposition. Currently, the script will delete the existing version of the table and replace it with the updated version. It is also possible to append the query results to the current table.
function updateTable() { // insert your BigQuery project here // this can be found in the URL of the BigQuery interface var projectId = 'your-project-id'; // insert the dataset where you want to create the table here var datasetId = 'my_dataset'; // insert the name of the table that you want to create here var tableId = 'my_table'; // this section creates a job id so app scripts can check on the status // of your query var date = new Date(); var ts = Math.round(date / 1000); var jobId = "app_script_" + tableId + '_' + ts; var job = { jobReference: { projectId: projectId, jobId: jobId }, configuration: { query: { // insert your query here query: "SELECT \ author, \ title \ FROM \ [bigquery-public-data:hacker_news.stories] \ LIMIT \ 10", destinationTable: { projectId: projectId, datasetId: datasetId, tableId: tableId }, // the write disposition tells BigQuery what to do if this table // already exists // WRITE_TRUNCATE: If the table already exists, BigQuery overwrites the table data. // WRITE_APPEND: If the table already exists, BigQuery appends the data to the table. // WRITE_EMPTY: If the table already exists and contains data, a 'duplicate' error is returned in the job result. writeDisposition: 'WRITE_TRUNCATE', allowLargeResults: true } } }; // send the job to BigQuery so it will run your query var runJob = BigQuery.Jobs.insert(job, projectId); Logger.log(runJob.status); var status = BigQuery.Jobs.get(projectId, jobId); // wait for the query to finish running before you move on while (status.status.state === 'RUNNING') { Utilities.sleep(500); status = BigQuery.Jobs.get(projectId, jobId); } } - Save your query then do a test run.
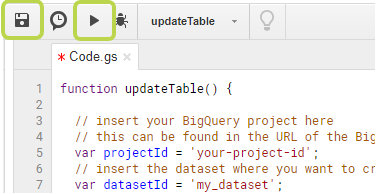
- In the BigQuery interface, check the query history to see if your query successfully ran. You should also double check the table to make sure it was updated appropriately.

- If everything ran correctly, it’s time to schedule the apps script to run on a regular basis.
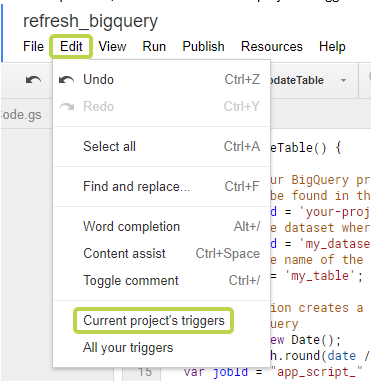
- In the script editor, click on “Edit” -> “Current project’s triggers”.
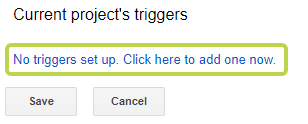
- Click to set up a new trigger.
- Select your function (updateTable) and an appropriate schedule to run your query. Then click “Save”.

- In the script editor, click on “Edit” -> “Current project’s triggers”.
- Congratulations! You are done! Check back on your tables after the next scheduled update to make sure everything is running as expected. Then configure your reporting tool to pull in data from that table.
Now that you have the data organized exactly how you want it, you’re ready to connect into the tool of your choice. Take advantage of all of the power of BigQuery with your analytics reports!


