Migrating Complicated Websites To Google Tag Manager
Google Tag Manager makes managing the Google Analytics tags on your website simpler and easier. It’s the single place where all your tags live. It allows you to update, test, and deploy changes at your own pace, and it provides a single, consistent interface for all your Google Analytics Events, along with any other tags you may have on your website.
This is great for a new website, where you start with a clean slate and can make sure that all of your tracking is implemented using Tag Manager. But what about websites that have been around for a while? Large websites that have been around for years tend to accrue hundreds of calls to ga() (or even _gaq.push()) calls woven into dozens of HTML templates, either directly or through the use of home-grown utility libraries that have also expanded and evolved over years. These may have been implemented by different developers, in different styles, and finding all of them may be a challenge.
This blog post covers some basic strategies for managing the transition from hard-coded Google Analytics tags to an implementation managed by Google Tag Manager.
Run Both Google Analytics Implementations Side-by-Side
One of the most basic approaches to this transition is simply having an ‘overlap’ period where your old hard-coded implementation lives on the page at the same time as your new implementation in Google Tag Manager. This allows you to have an apples-to-apples comparison of the data that the two implementations collect for the same set of user behavior. Any differences you see in your reports will definitely be from the implementation, and not just a natural fluctuation in traffic numbers from one month to the next. More importantly, when both tools are active you can run through the site yourself and see what hits are generated.
For this strategy, it is absolutely critical that data from the two implementations be completely segregated. Each time a user views one of your pages, there will be two pageview hits sent to Google Analytics. If both of those hits end up in the same report, then all of your reporting will be wrong. In addition to inflating pageviews, metrics like Time of Visit and Bounce Rate will be thrown to the four winds.
The best approach is to use a brand-new Google Analytics property for your Tag Manager implementation. This prevents any situation where data from the two tools will show up in the same report by accident. It also allows you to configure the new implementation without affecting any existing reporting, such as upgrading from Classic to Universal Analytics, or updating the Referral Exclusion List. While it is possible to separate the data from the new implementation into a new View in an existing property, this requires much more careful configuration and is more error-prone.
The downside of this approach is that the new property will need to be configured from scratch, and will have no historical data. The historical data will still be present in the legacy property indefinitely, but reporting covering the time period before the switch-over will need to be pulled separately and merged manually. While inconvenient, this may be desirable because it prevents people from accidentally comparing data from the different implementations without being aware of the difference.
We’ve outlined this basic process in another blog post, Safely Migrating To Google Tag Manager. Let’s go into a little more detail about some of the technical challenges that you may face and some solutions to help you along the way.
Blocking Unwanted Hits from your New Property
After determining everything is ready to swap, you make the switch in Google Tag Manager and started sending the Pageviews and Events from Google Tag Manager to the correct Google Analytics Property. Even after you re-implement your existing Google Analytics tags in Tag Manager, it may be hard to verify that you have removed every single hard-coded tag on the page. This can cause problems!
The most basic problem is double-tagging, where the same page or interaction is sending data twice, once from a hard-coded tag and once from a Tag Manager tag. If you’re lucky, this only results in one number being twice as large, which is simple to correct. But there can be plenty of other issues as well, such as Bounce Rate being affected, or the two tags not always firing at the same time, or the two tags having different naming conventions for their Event. There are additional subtle problems that can be caused by misconfigured tags, especially if any of the old tags are Asynchronous Google Analytics instead of Universal Analytics.
Fortunately, there are a handful of settings that can be enabled to make sure that your Google Analytics reports only include hits from tags that were set up in Tag Manager.
Container ID Filter
The first mitigation technique is to have every Tag Manager tag tell Google Analytics that it came from Tag Manager, and tell Google Analytics to ignore any other tags. While this is fairly simple to accomplish, it does require discipline: you need to add this field to every single Google Analytics tag in Tag Manager, both in the present and in the future.
To achieve this, do the following steps:
- In Google Analytics, enable a new Hit-level Custom Dimension named “GTM Container ID.” We could use any other static value we wanted to, but the GTM Container ID communicates our intent most clearly. Note the index of the new variable.
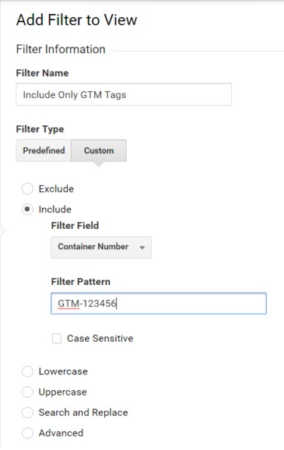
- In Google Analytics, create a new Include filter that looks for the Container ID of your GTM Container. This is the same ID that you use when placing the code on the page, and looks like “GTM-XXXXXX.” To guard against errors, it is best practice to place this new filter on a Test View to verify before placing it on your real views. Also, always keep an unfiltered View that doesn’t have any filters at all, just in case.
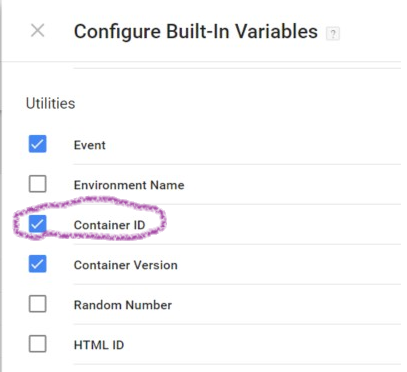
- In Google Tag Manager, enable the Built-In Variable named “Container ID.”
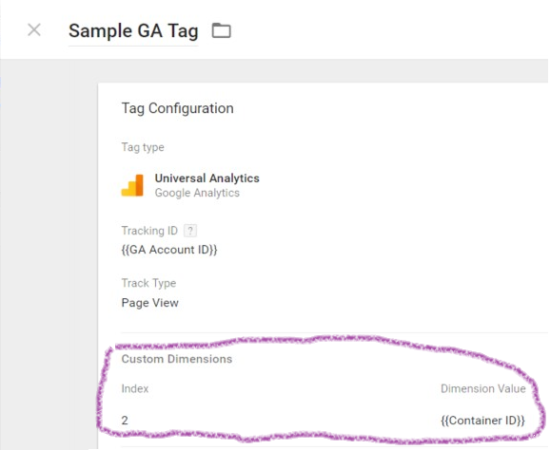
- Add the new variable as a Custom Dimension on all of your Google Analytics tags.
- Test the tag! Use Debug Mode to verify your change before you publish, and use the Real-Time Reports in your Test View to verify the change after you publish.
- Once you’re ready, add the filter from your Test View into the main Views in your Property.
Remember that once you make this change, Google Analytics will filter out ALL hits that do not contain the Custom Dimension. By INCLUDING hits with the correct Google Tag Manager Container ID, you are EXCLUDING all hits that do not have that value. Even if the hit really did come from Tag Manager, Google Analytics will filter it out unless you add the Custom Dimension to it!
Recommendation: Remember to use a Test View to verify this is working correctly. Adding Filters to your View will permanently alter your data moving forward. If you exclude data from a View, you cannot recover that information.
Disable Legacy History Import
While Universal Analytics processes traffic source information on Google’s servers, it still reads traffic source information stored in cookies by previous versions of Google Analytics. Most of the time, this is what you want because it provides continuity of data. But if your legacy implementation has spurious traffic source data (such as misconfigured subdomain tracking, or the use of utm_ parameters on internal links), you may wish to make a clean break with history.
You can do this by setting the legacyHistoryImport field to False on your Google Analytics tags, under the “Fields to Set” part of tag configuration. This setting does not show up in the dropdown menu, but is part of the official API. If you choose to use this field, you should set it on every single one of your Google Analytics tags.
Finding Remaining Analytics Calls
While it’s important to prevent bad data from getting into your new implementation, it’s also important to make sure you didn’t forget to include any good data. These tips will help you make sure that your new Tag Manager implementation isn’t missing any major interactions.
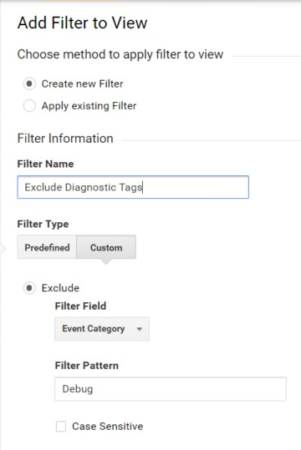
Both the following techniques use a new tag to send extra Event data to your Google Analytics property, which you will need to review. In order to keep your main report clean, you can give these tags a unique Category that you filter out of your main reporting view, while keeping them in your test view. You should use a descriptive term such as “Debug” that you can re-use for other “diagnostic” events. After you are confident about your new implementation, you can remove the diagnostic tags.
Catch-All Tags
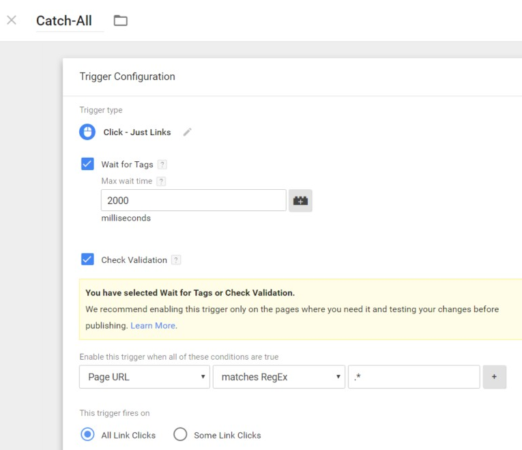
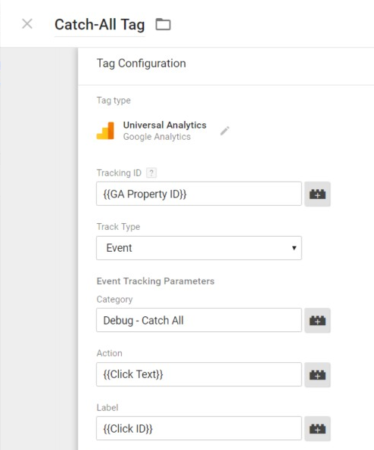
One way of finding links you may have missed is to use a “catch-all” tag, which captures all untracked clicks on your website. Reviewing data from this tag will let you find any links of significance that you should tag.
Be thoughtful when attempting this process. Tracking every. click. on your website can mean a lot of additional hits. That will certainly increase your hit volume for the month, and potentially push you over the 10 million hit limit (but only temporarily.) You likely don’t need to run this for a very long time, so consider setting an End Date on that tag so it automatically stops firing after a week or so.
The trigger for your catch-all tag should fire on “All Link Clicks,” instead of the usual “Some Link Clicks.” You should include ALL of your existing link triggers as Firing Exceptions on your tag, so that it only reports on links where you don’t have tracking yet. Make sure that your tag includes enough information that you can identify where the link click came from, such as Click Text and Click ID.
Hijacking the Google Analytics Object
As a last resort, you can intercept calls to the legacy Google Analytics, and log them to a test view. If your legacy implementation uses a utility library, it’s easy to replace these functions with new ones that push to the Data Layer instead. If necessary, you can add replacements for the _gaq or ga objects onto the page that do the same thing. Another tag in GA can read from these Data Layer pushes and send Events to Google Analytics.
We include this suggestion as theory-only. You should only attempt this if you feel comfortable technically with the process. The code below shows a very simple example of how this might work for Classic Google Analytics, but hasn’t been tested extensively in every situation or implementation. Use this as a guide and create a solution that works for you.
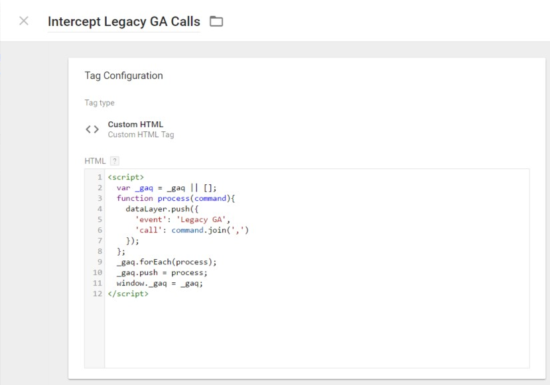
The purpose of these Events is not to let the remaining hard-coded Events to function, but to identify them so they can be migrated into Tag Manager. The tag in Tag Manager should not try to recreate the same Event call that the hard-coded analytics was trying to send. Instead, it should send hits that are clearly distinguished as diagnostic calls, with enough information to find the original call site. You can use the same “Debug” filter from the previous tip to keep these calls out of your main reporting view.
Concluding Thoughts
Any change in implementation strategy will have an impact on your data. Your goal with Tag Manager shouldn’t be to exactly reproduce your existing implementation. Rather, your goal should be to create a robust, maintainable implementation, while being able to explain how it differs from the previous one. These tips will let you have confidence in your new implementation, by letting you see and control what data is being sent and what data you are choosing to receive.


